ESC User Manual
This manual is intended for all users of our Erosion Control (ESC) product
Learn more »
Inspections
Inspections
More »
Corrective Actions
Corrective actions
More »
Groups (a.k.a. Zones)
Groups (a.k.a. Zones)
More »

Guide to the
Administration Module
Managing Accounts and Permissions for SEH Client Access Point Applications
Revision: June 12, 2008
Getting Started
Administration is a feature within your SEH website that lets the Client Administrator add users, change passwords, control permissions, and maintain contact information. Individual users can also log in to change their own password.
Logging in to the Administration tab
The Administration tab is available when you log in to your SEH client site. To log in to the Administration tab:
-
Open your web-browser.
-
In the address field, enter the web address for your SEH client site.
-
On the Welcome page, click the Client Login link.
-
On the login page, enter your user name and password.
-
Click the Administration tab.
The opening screen depends on the user’s login:
-
User version opens to the View User page ().
-
Client Administrator version opens to the View Client page ().
See the following sections for more information about the Administration module:
-
User
:
Quick Start Reference for the User
and
Administration tab for the User
-
Client Administrator
:
Quick Start Reference for the Client Administrator
and Administration tab for the Client Administrator
-
SEH Administrator
: See
SEH Administrator Addendum for the Administration Module
(a separate document)
What is on the Computer Screen?
The image below shows the main parts of the
Administration
computer interface. For more detailed information, see the description of each page in later sections of this document.
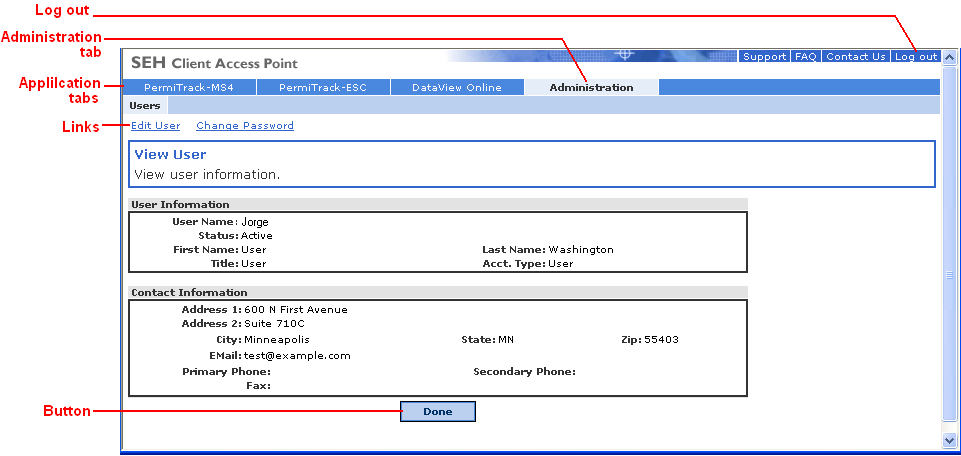
Log Out
Click the Log Out link to close the application and log out of the website.
Administration Tab
Click the Administration tab to go to the Administration module. Use this module to change your password [for all users] or set up users and contacts [for the administrator only].
Application tabs
The application tabs take you to your SEH Client Access Point applications or modules. For example, click the PermiTrack-ESC tab to begin working with your erosion control records.
Note
: The tabs available depend on the application used at your organization or company. You may not have all of the tabs displayed or mentioned in this guide.
Links
The links across the top of each page let you set edit existing items, create new records, or go to a different view.
Button
At the bottom of the page, you generally find a button for saving your changes or canceling without saving. The pages showing lists of items generally do not include buttons.
Quick Start Reference for the User
Each user who has access to the Client Access Point is allowed to change their password and contact information. This information can also be changed by the Client Administrator.
Change Your Password
-
Log in to the Client Access Point.
(See
Logging in to the Administration tab
for more detailed information.)
If you do not have a login user name and password, contact your Client Administrator.
-
Click the Administration tab in the row of tabs near the top of the page.
-
On the View User () page, click the Change Password link just below the list of tabs.
-
On the Change Password page, type your new password in the New Password field.
-
Type the new password once more in the Confirm field.
-
Click the Change Password button.
You will use this new password the next time you log in.
-
Click one of the other application tabs to begin work
or click the Log out link in the upper-right corner to close the application.
Update Your Contact Information
-
Log in to the Client Access Point.
(See
Logging in to the Administration tab
for more detailed information.)
If you do not have a log in, contact your Client Administrator.
-
Click the Administration tab in the row of tabs near the top of the page.
-
On the View User () page, click the Edit User link just below the list of tabs.
-
On the Edit User page, update your address, phone, or other contact information.
(See page for more information.)
-
Click the Update User button to save your changes.
-
Click one of the other application tabs to begin work
or click the Log out link in the upper-right corner to close the application.
Quick Start Reference for the Client Administrator
The following procedures take you through some of your common tasks. For more detailed information on the pages and fields on those pages, see the sections of this document that follow.
Adding a User
If a new employee joins your organization, create a user account through the Administration module:
-
Log in to the Client Access Point.
(See
Logging in to the Administration tab
for more detailed information.)
-
Click the Administration tab in the row of tabs near the top of the page.
-
On the View Client page (), click the Users tab.
-
On the User List page (), click the New User link just below the row of tabs.
-
On the Create User page (), record the person’s name and address.
-
Select
User
from the Account Type drop down list.
-
Give the person access to one or more of the SEH Client Access Point applications by selecting the appropriate check boxes.
-
If you are giving the user access to PermiTrack-ESC, select a role in the drop down list to the right of the PermiTrack-ESC check box.
(See the PermiTrack-ESC Only procedures () and the Roles tab for information on setting roles and permissions.)
-
Click the Create User button to save your changes.
-
On the View User page (), click the Change Password link below the row of tabs.
-
On the Change Password page, ), enter a new password for the user and retype it in the Confirm Password field.
-
Click the Change Password button to save your changes.
-
Give the user their new login user name [displayed on the View User page ()], and the password that you just assigned.
Changing a User’s Password
If a user has forgotten their password or you need to change it for security reasons, you can reset or change a user’s password:
-
Log in to the Client Access Point.
(See
Logging in to the Administration tab
for more detailed information.)
-
Click the Administration tab in the row of tabs near the top of the page.
-
On the View Client page (), click the Users tab.
-
On the User List View page (), click on the user’s name in the list.
-
On the View User page (), click the Change Password link.
-
On the Change Password page (), enter the user’s old password and new password.
-
Click the Change Password button to save your changes.
The user will use this new password the next time they log in.
Add a Contact
The list of contacts is available through the PermiTrack-ESC application, and can be used for reference.
-
Log in to the Client Access Point.
(See
Logging in to the Administration tab
for more detailed information.)
-
Click the Administration tab in the row of tabs near the top of the page.
-
On the View Client page (), click the Contacts tab.
-
On the Contact List page (), click the New Contact link under the row of tabs.
-
On the Create Contact page (), record the contact’s organization, address, and phone.
-
If you use PermiTrack-ESC, select the contact’s type in the Contact Type section near the bottom of the screen.
-
Click the Create Contact button to save your changes.
PermiTrack-ESC Only
The following procedures are used only by sites that use PermiTrack-ESC.
Change the Receipt/Reply E-mail Addresses for the
Public Access Site
Use Administration to set the e-mail addresses used to receive e-mail from the public access site and for automatic replies to public comments.
-
Log in to the Client Access Point.
-
Click the Administration tab in the row of tabs near the top of the page.
-
On the View Client page (), click the PermiTrack-ESC link just below the row of tabs.
-
On the Client PermiTrack-ESC page (), click the Edit link.
-
Update the e-mail address fields.
-
Click the Update PermiTrack-ESC Setup button to save your changes.
Add a User Role to Set Permissions
PermiTrack-ESC roles specify the user permissions you assign to individual users. See
Roles Tab
. To add a role:
-
Log in to the Client Access Point.
-
Click the Administration tab in the row of tabs near the top of the page.
-
On the View Client page (), click the Roles tab.
-
On the Roles List page (), click the New PermiTrack-ESC Role link.
-
On the Create PermiTrack-ESC Role page (), enter a descriptive name and description for the role you are creating.
-
Click the applicable check boxes to assign permissions to the role for each type of PermiTrack-ESC function.
Users assigned to this role will have only the permissions that you specify.
-
Click the Create New PermiTrack-ESC Role button to save your changes.
-
Assign the role to a user through the Create User page () or Edit User page (), by selecting the PermiTrack-ESC check box and choosing the new role from the drop-down list.
-
Click the Create User or Update button to save your changes.
This user now has the level of access to the PermiTrack-ESC site defined by the role.
Administration tab for the User
Individual users have access to the Administration application in order to change their password and contact information.
Opening page
When you log in to the SEH Client Access Point, it opens to one of your application pages. For example, if you use PermiTrack-MS4, it opens to the PermiTrack-MS4. The applications available to you are shown in the tabs near the top of the screen. (Contact your Client Administrator or SEH Administrator for help with these applications.)
To administer your account, click the Administration tab.
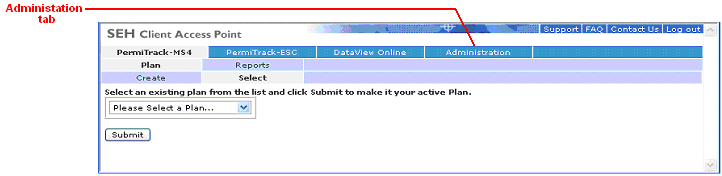
Figure 1. Client Access Point Opening page
View User page
The View User page displays all of your contact and account information. From this page, you can update this information or change your login password.
The View User page opens when you click the Administration tab on the opening page ().
Figure 2. View User page
Links on the Client List page
-
Edit User
: Click the Edit User link to edit your address, phone number, or e-mail address. When you click this link, the Edit User page opens ().
-
Change Password
: Click the Change Password link to change your password for logging in to the Client Access Point. The Change Password page () opens.
Edit User page
The Edit User page lets you change your contact information, including address, phone, and e-mail address.
The Edit User page opens when you click the Edit User link on the View User page ().
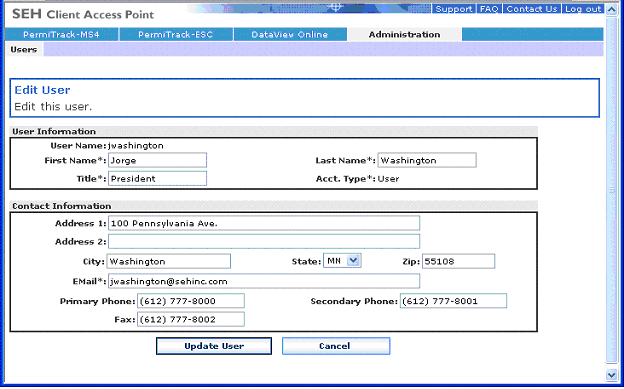
Figure 3. Edit User page
Fields on the Edit User page
-
User Information
: Update your name or address in this section.
-
User Name
(view only): The user name you enter when you log in to the Client Access Point. (This name is set by your Client Administrator.)
-
First Name & Last Name
: Your first and last name, as it should appear in lists in the applications.
-
Title
: Your job title or position.
-
Acct. Type
(view only): You are assigned to a User account. This information is set by your Client Administrator.
-
Contact Information
: Update your address and/or phone information in this section.
-
Address 1 & Address 2
: Lines 1 and 2 of your mailing or street address.
-
City, State, & Zip
: City, state, and zip code for your mailing or street address.
-
Email
: Your email address.
-
Primary Phone
: Your primary or preferred phone number.
-
Secondary Phone
: Your secondary phone number. For example: a cell phone.
-
Fax Phone
: Phone number where you receive faxes.
Buttons on the Edit User page
-
Update User
: Click the Update User button to save the changes you made on this page and return to the View User page ().
-
Cancel
: Click the Cancel button to discard any changes you made on this page and return to the View User page (.) Your changes are not saved.
Change Password page
The Change Password page lets you change your password for logging in to the Client Access Point. Before changing the password, confirm that the correct user name is displayed in the Change Password box on this page.
A password can be modified by either the user or the Client Administrator.
The Change Password page opens when you click the Change Password link on the View User page ().
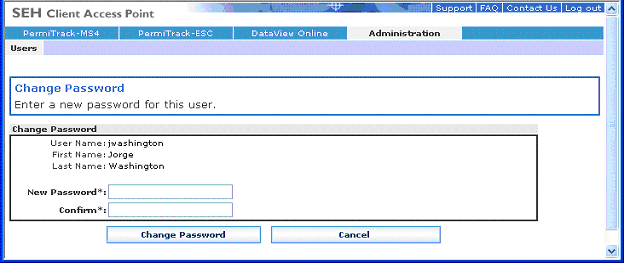
Figure 4. Change Password page
Fields on the Change Password page
-
New Password
: In the New Password field, type the new password that you want to use. You do not enter your old or existing password.
-
Confirm
: In the Confirm field, re-type the new password to confirm that you entered it correctly.
Note
: When you click the Change Password button below, the new password is set. You will use this new password the next time you log in.
Buttons on the Change Password page
-
Change Password
: Click the Change Password button to save the new password that you entered on this page. You return to the View User page (.)
-
Cancel
: Click the Cancel button to discard any changes you made on this page and return to the View User page (.) Your changes are not saved.
Administration tab for the Client Administrator
The Administration application is used to:
-
Set up accounts for the people who use your SEH applications.
-
Record contact information that may be displayed in other applications.
-
Create roles for PermiTrack-ESC to grant various levels of permissions that you can assign to individual users. (This option is available only if you have the PermiTrack-ESC application.)
Opening page
When you login in to the SEH Client Access Point, it opens to one of your organization’s application pages. To administer your site’s account, click the Administration tab in the upper part of the screen.
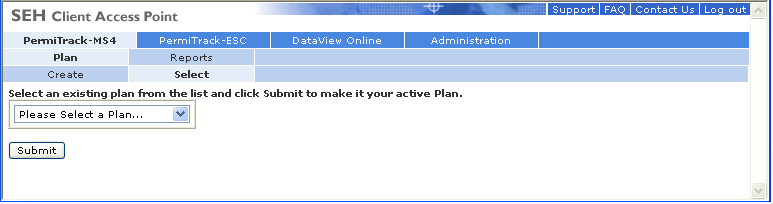
Figure 5. Opening page
View Client page
On the Client View page, you can review your client information, including your organization’s contact information and the SEH applications you use. From this page, use the links above the information sections to edit the client information, or click the tabs to setup users, PermiTrack-ESC roles, or contact people.
The View Client page opens when you click the Administration tab on the opening page ().
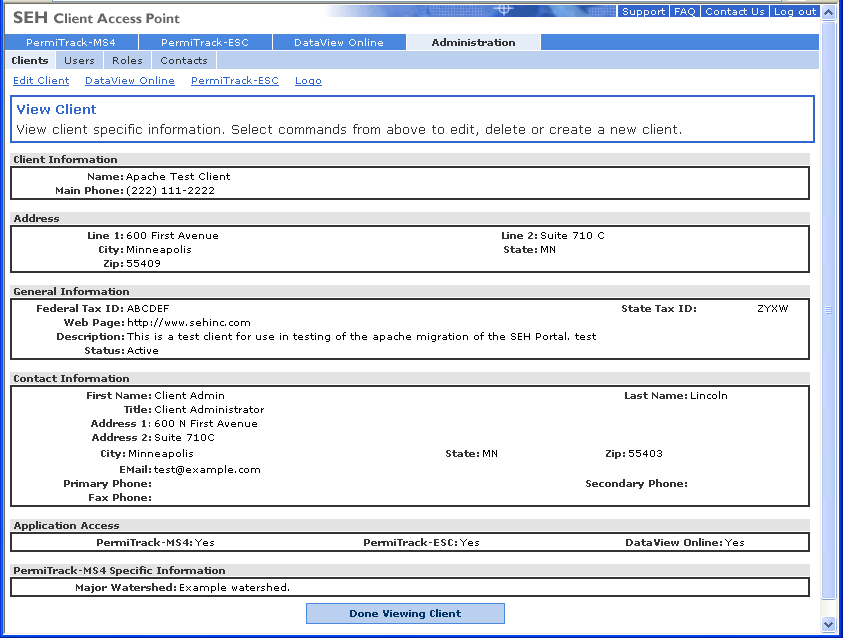
Figure 6. View Client page
Information Displayed on the View Client page
Information on the View Client page was entered when your organization’s site was created. For descriptions of these sections, see the Edit Client page ().
Links and Button on the View Client page
The following links and button are available below the tabs on the Client View page:
-
Edit Client
: Opens the Edit Client page (), where you can update the client information.
-
DataView
: View setup information for the DataView Online application, if your site uses this application.
-
PermiTrack - ESC
: View setup information for the PermiTrack-ESC application, if your site uses this application.
Roles for PermiTrack-ESC are set through the Roles tab (see Role List page ).
-
PermiTrack – MS4
: View setup information for the PermiTrack-MS4 application, if your site uses this application.
-
Done Viewing Client
: This button is not used by the Client Administrator. Click one of the links or tabs to go to a different part of the Administration module, or to open one of the other applications.
Tabs on the View Client page
-
Clients tab
: Return to the View Client page from one of the other tabs.
-
Users tab
: Opens the User List where you can add a new user or update information for an existing user.
-
Roles tab
: Opens the Roles List where you can edit an existing role or add a new role for PermiTrack-ESC. Use Roles to set a group of permissions that you can assign to users, as needed.
-
Contacts tab
: Opens the Contacts List where you can edit an existing contact record or add a new contact.
Edit Client page
On the Edit Client page, you can update the contact information and general information for the selected client. After your site has been set up, you will rarely need to update this information.
The Edit Client page opens when you click the Edit Client link on the Client View page (). You return to the Client View page when you click either the Update Client button or the Cancel button.
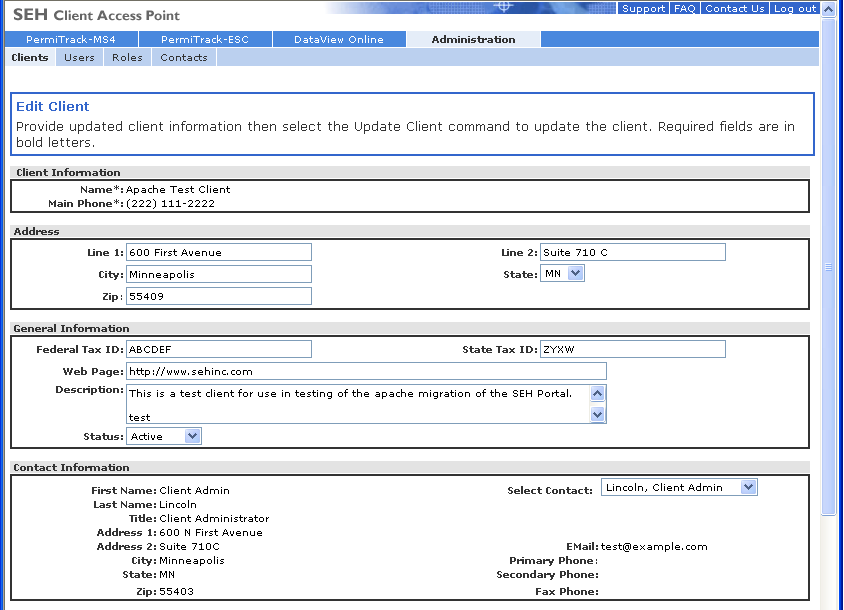

Figure 7. Edit Client page
Fields on the Edit Client page
View or update the following client information on this page.
-
Client Information
: The fields in the Client Information section can only be edited by your SEH Administrator.
-
Name
: Name of the client agency, company, or organization.
-
Main Phone
: The main phone number for the client or phone number for the client’s headquarters or primary office.
-
Address
: Update the client’s address in the Address section.
-
Line 1 & Line 2
: Line 1 and 2 of the client’s mailing or street address. For example, the street, suite number, or P.O. box.
-
City, State, Zip
: City, state, and zip code for the client’s mailing or street address.
-
General Information
: Edit the client’s tax IDs or website information in the General Information section.
-
Federal Tax ID
: Client’s Federal Tax ID, if applicable.
-
State Tax ID
: Client’s State Tax ID, if applicable.
-
Web Page
: URL for the client’s web site. For example
www.acme.com
Note
: This web address is not used for the client access site if you use PermiTrack-ESC. That address is set by the SEH Administrator.
-
Description
: Additional descriptive information or notes that you want to record.
-
Contact Information
: Review the contact information or select a different primary contact in the Contact Information section. This section is generally used to record information for the Client Administrator, who serves as the primary contact for SEH, and for users needing help.
-
First Name & Last Name
: First and last name of the primary contact person for the client.
-
Title
: Job title or position of the contact person within the client organization.
-
Address 1 & Address 2
: Lines 1 and 2 of the contact’s mailing or street address.
-
City, State, & Zip
: City, state, and zip code for the contact’s mailing or street address.
-
Email
: Contact’s email address.
-
Primary Phone
: Contact’s primary or preferred phone number.
-
Secondary Phone
: Secondary phone number for the contact, for example a cell phone.
-
Fax Phone
: Phone number where the contact receives faxes.
-
Select Contact
: This field shows the name of the primary contact for the client. Click the drop-down list to select a different name. The drop-down list includes the names of users who are designated as Client Administrator for the current site.
If you select a name in the list, this person is saved as the primary contact when you click the Update Client button at the bottom of the page.
-
Application Access
: The Application Access indicates which applications are available to the client.
-
PermiTrack-MS4
: If Yes appears next to PermiTrack-MS4, the PermiTrack-MS4 application is available to users at the client site.
-
PermiTrack-ESC
: If Yes appears next to PermiTrack-ESC, the PermiTrack-ESC application is available to users at the client site.
-
DataView
: If Yes appears next to DataView Online, the DataView Online application is available to users at the client site.
-
PermiTrack MS4 Specific Information
: If the client uses the PermiTrack-MS4 application, the text box displays the major watershed specified for the client’s application.
Buttons on the Edit Client page
-
Update Client
button: Click the Update Client button to save the changes you made on this page. The updated client record is saved, and you return to the Client View page.
-
Cancel
button: Click the Cancel button to discard or delete any changes on this page, and return to the Client View page.
Client – DataView Online page
On the Client – DataView Online page, you can view the setup information for your DataView Online application. If your site does not use DataView Online, this page is not available. (Contact your SEH Administrator for more information on the DataView Online application.)
The Client – DataView Online page opens when you click the DataView Online link on the Client View page ().
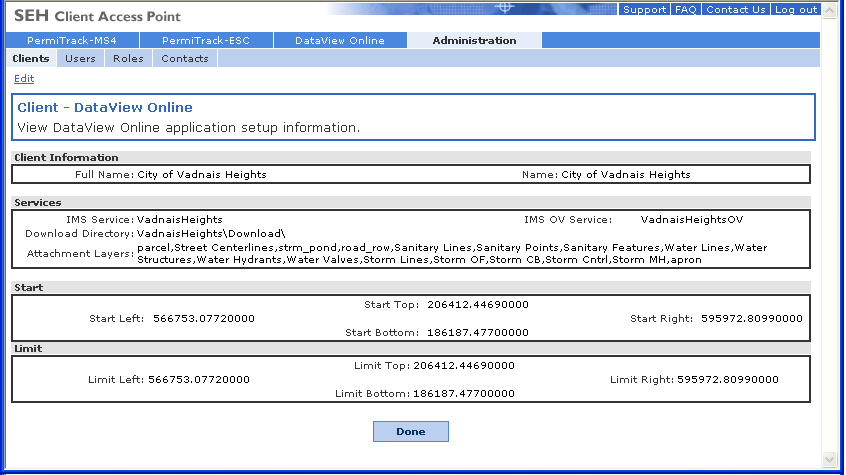
Figure 8. Client - DataView Online page
Link and Button on the Client – DataView Online page
-
Edit
: Click the Edit link near the top of the page to open a page where you can edit the information displayed on the DataView Online page.
Note
: Ask your SEH Administrator to make any changes that you need. It is possible to edit this information yourself, but we do not recommend it.
-
Done
button: Click the Done button to close this page and return to the Client View page.
Client – PermiTrack-ESC page
On the Client – PermiTrack-ESC page, you can view the e-mail addresses and URL set up for your PermiTrack-ESC application. If your site does not use PermiTrack-ESC, this page is not available. (Contact your SEH Administrator for more information on the PermiTrack-ESC application.)
The Client – PermiTrack-ESC page opens when you click the PermiTrack-ESC link on the Client View page ().
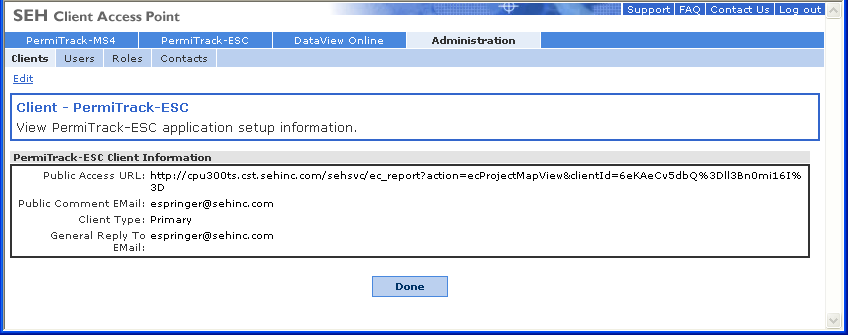
Figure 9. Client - PermiTrack-ESC page
Link and Button on the Client – PermiTrack-ESC page
-
Edit
: Click the Edit link near the top of the page to open a page where you can edit the information displayed on the - PermiTrack-ESC page.
For example, use this link to change the e-mail address that receives public comments from your PermiTrack-ESC public assess site.
Note
: You can only change the e-mail addresses displayed here. Ask your SEH Administrator to make any changes needed to the Public Access URL.
-
Done
button: Click the Done button to close this page and return to the Client View page.
Edit Client – PermiTrack-ESC page
On the Edit Client – PermiTrack-ESC page, you can change the e-mail addresses and set up for your PermiTrack-ESC application. If your site does not use PermiTrack-ESC, this page is not available. (Contact your SEH Administrator for more information on the PermiTrack-ESC application.)
The Client – PermiTrack-ESC page opens when you click the Edit link on the Client – PermiTrack-ESC page ().
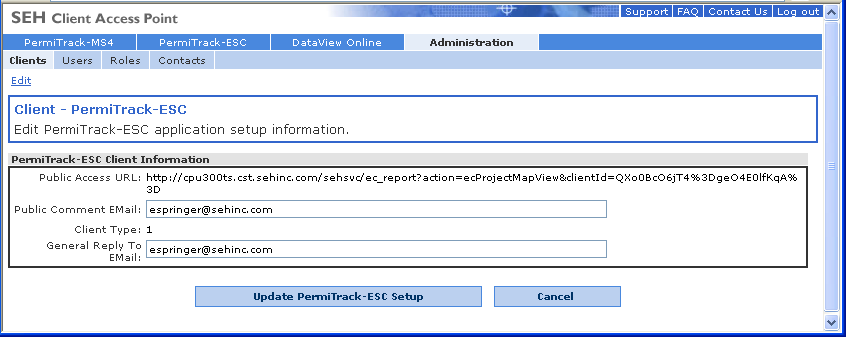
Figure 10. Edit Client - PermiTrack-ESC page
Fields on the Edit Client – PermiTrack-ESC page
-
Public Comment EMail
: In the Public Comment EMail field, enter the e-mail address that should receive e-mails generated from the public access site that is part of your PermiTrack-ESC site.
-
General Reply To EMail
: In the General Reply To EMail field, enter the e-mail address that is used on the automatic reply to public comments received via e-mail.
Buttons on the Edit Client – PermiTrack-ESC page
-
Update PermiTrack-ESC Setup
: Click the Update PermiTrack-ESC Setup button to save the changes you made on this page.
-
Cancel
button: Click the Cancel button discard any changes you made before saving, and to close this page.
Logo page
On the Logo page, you can choose a graphic file with your client logo for display on reports generated from the Client Access Point applications. If you do not choose a logo, the SEH logo is displayed.
The Logo page opens when you click the Logo link below the tabs on the View Client page ().

Figure 11. Logo page
Fields & Button on the View Client Logo page
-
Select an image file
field: The name of the logo file is displayed in the text box. This logo is displayed on your reports.
-
Browse
button: Click the Browse button to search for the image file that you want to use for the site logo. The file name is displayed in the text box.
The graphic file must be a .JPG, .GIF, or .PNG.
-
Save Logo button
: Click the Save Logo button to save the file you chose. This file is now used for the logo on your website.
Users Tab
User List page
The User List page lists all of the users set up for your client site. These users have permission to view or interact with applications on your Client Access Point site.
The User List page opens when you click the Users tab at the top of the Client View page ().
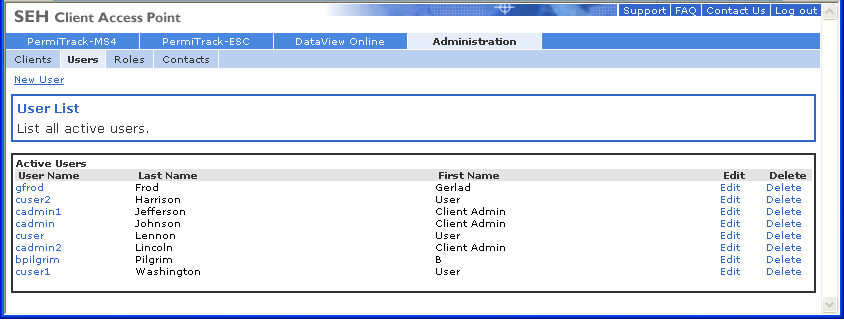
Figure 12. User List page
Links on the User List page
Use these links to view or modify the information and settings for a specific user.
-
New User
: Click the New User link just below the tabs to add a user to the current client. The Create User page () opens.
-
User Name
: Click a name in the User Name column to view that person’s record. The User View page opens ()
-
Edit
: Click the Edit link at the end of a user’s row to edit or update the record for that user on the Edit User page ().
-
Delete
: Click the Delete link at the end of a user’s row to remove that user. The Delete User page opens ().
Create User page
On the Create User page, record contact information for a new user and give them access to the Client Access Point applications. This user is now displayed on the User List page (). After setting up a user on this page, you can set their password on the Change Password page ().
The Create User page opens when you click the New User link on the User List page ().
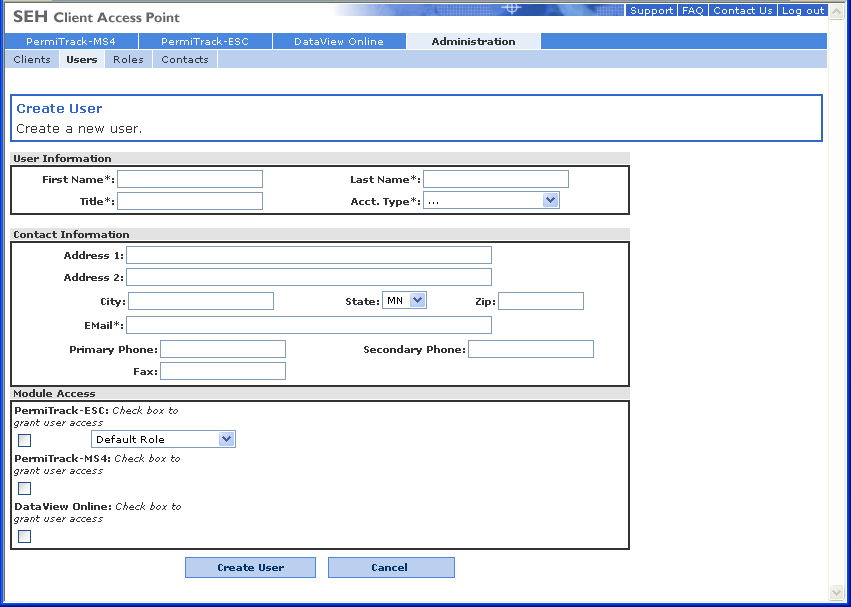
Figure 13. Create User page
-
User Information
: In the User Information section, record contact information for the person you are adding as a user. These fields are available.
-
First Name & Last Name
: First and last name of the user who will use the account.
-
Title
: Job title or position of the user within the client organization.
-
Account Type
: Select an Account Type to indicate the type of access you are granting to this user.
Client Administrator
: The Client Administrator has permission to set up users, define roles, and make other changes in the Administration application. This role is generally assigned to only one person at the client site.
User
: A User can be granted access to the applications set up for your client site (PermiTrack-ESC, PermiTrack-MS4, and Dataview).
After recording this person’s contact information and assigning a password, the User account has access to this Administration application only for changing their password and contact information. (See
Administration Tab for the User
.)
-
Contact Information
: Record the user’s street and e-mail addresses, and phone numbers in the Contact Information section. This information is for your reference.
-
Address 1 & Address 2
: Lines 1 and 2 of the user’s mailing or street address.
-
City, State, & Zip
: City, state, and zip code for the user’s mailing or street address.
-
Email
: User’s email address.
-
Primary Phone
: User’s primary or preferred phone number.
-
Secondary Phone
: Secondary phone number for the user, for example a cell phone.
-
Fax Phone
: Phone number where the user receives faxes.
-
Module Access
: Give access to the site management applications through the Module Access section.
-
PermiTrack-ESC
: Select the check box to let this new user to login to and use the PermiTrack-ESC application. This user must also have a password set up on the Change Password page ().
 PermiTrack-ESC
: This user has access to the PermiTrack-ESC application, as part of their Client Access Point login.
PermiTrack-ESC
: This user has access to the PermiTrack-ESC application, as part of their Client Access Point login.
 After selecting the PermiTrack-ESC application check box, select a role from the drop down list. The role defines the user’s permissions within the PermiTrack-ESC application. For example, you may grant read-only rights, or read/write/delete rights in the application.
Your site is installed with default roles. You can also customize these roles or create new roles on the New User Role page ().
-
PermiTrack-MS4
: Select the check box to let this new user to login to and use the PermiTrack-ESC application. This user must also have a password set up on the Change Password page ().
PermiTrack-MS4
: This user has access to the PermiTrack-MS4 application, as part of their Client Access Point login.
-
DataView Online
: Select the check box to let this new user to login to and use the DataView Online application. This user must also have a password set up on the Change Password page ().
DataView Online
: This user has access to the DataView Online application, as part of their Client Access Point login.
Buttons on the Create User page
-
Create User
: Click the Create User button to save your changes and create the user’s account.
-
Cancel
: Click the Cancel button to discard any changes and return to the User List page. The user is not saved.
User View page
The User View page shows all of the information set up for the user you selected on the User List page. This person has access to the Client Access Point site.
The User View page opens when you click the name of a user on the User List page ().
Figure 14. User View page
Information on the User View page
See the Create User page () for descriptions of the information displayed on this page.
Links & Button on the User View page
-
New User
: Click the New User link just below the tabs to add a user to the current client. The Create User page () opens.
-
Edit User
: Click a name in the User Name column to view that person’s record. The User View page () opens.
-
Delete User
: Click the Delete User link under the tabs to remove the user displayed on the View User page. The Delete User page () opens.
After being deleted, the person no longer has access to the site and is not listed on the User List page ().
-
Change Password
: Click the Change Password link under the tabs to open the Change Pasword page (), where you can change the password for the user displayed on this page.
-
Done
button: Click the Done button at the bottom of this page to return to the User List page.
Edit User page
On the Edit User page, change or update any of the user’s information. For example, use this page to update a phone number or job title.
The Edit User page opens when you click the Edit link under the tables on the View User page ().
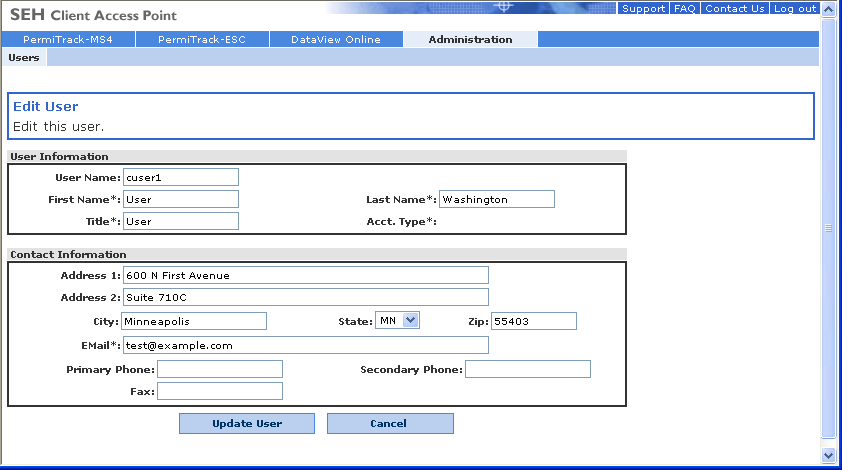
Figure 15. Edit User page
Fields on the Edit User page
Information on the Edit User page was entered when the user was set up. See the Create User page () for the descriptions of these fields.
Buttons on the Edit User page
-
Update User
: Click the Update User button to save your changes to the user’s record.
-
Cancel
: Click the Cancel button to return the User List page.
Change Password page
On the Change Password page, change the login password for the current user. This password, along with the user name displayed on the View User page (), is used to login to the Client Access Point site. For example, use this page if a user loses their password and needs it reset.
Note
: The user can also change their password. See
Quick Reference for the User
.
The Change Password page opens when you click the Change Password link under the tabs on the View User page ().
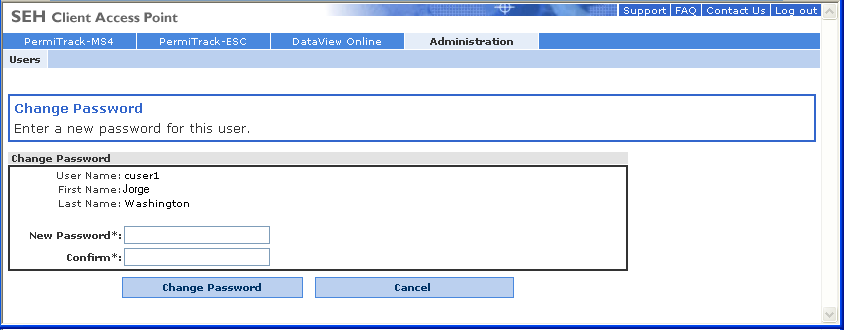
Figure 16. Change Password page
Fields on the Change Password page
-
User Name
: Displays the name of the user account you are changing.
-
New Password
: Type the new password.
-
Confirm
: Type the new password to confirm it.
Buttons on the Change Password page
-
Change Password
button: Click the Change Password button to change the user’s password to the new password. The next time this user logs in, they will use the new password.
-
Cancel
button: Clear any information you entered on this page without changing the password.
Delete User page
The Delete User page lets you confirm that you want to delete this user before deleting the record. If you clicked the Delete link on another page in error, the user is not deleted until you click the Delete User button on this page.
The Delete User page opens when you click the Delete User link below the tabs on the View User page ().
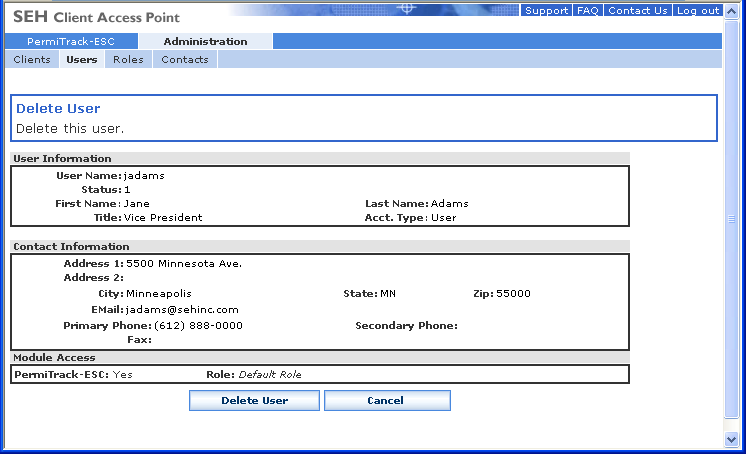
Figure 17. Delete User page
Fields & Buttons on the Delete User page
-
Delete User
button: Click the Delete User button to remove the current user from the client account. This person is no longer able to log in to the Client Access Point and their name is removed from the list of users ().
-
Cancel
button: Click the Cancel button to close this page without deleting the user.
Roles tab
Role List page
Roles are used to set the permissions for various types of users in the PermiTrack-ESC application. From the Role List page, you can view the list of roles, edit an existing role, or create a new role.
The User Roles page opens when you click the Roles tab in the upper part of the page
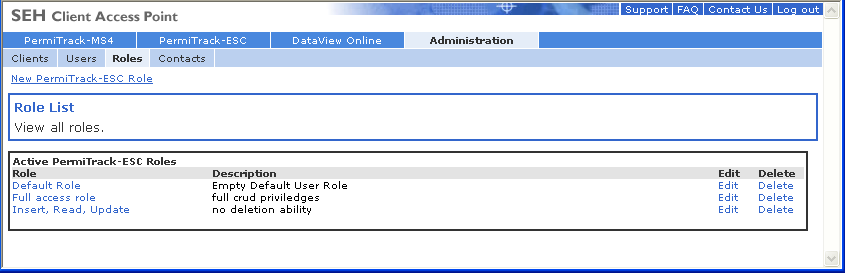
Figure 18. Role List page
Links on the User Roles page
-
Role
: Click the name of a role on the left side of the page to view more information about that role. The View User Role page () opens.
-
Edit
: Click the Edit link to the right of a role to make changes to the permissions granted to this role. Opens the Edit User Role page ().
-
Delete
: Click the Delete link to the right of a role to remove the role from the current client. Opens the Delete Role page ().
Create PermiTrack-ESC Role page
Roles are used to define the level of access available to users within the PermiTrack-ESC application. The role specifies whether users can create, read, update, and/or delete specific types of items within the application. For example, a Read-Only role lets the user view information, but not make changes.
On the New User Role page, you define the role by entering a descriptive name and setting the permissions for the role. The roles can then be assigned to users through the Users tab (). Use this page to add to or modify the predefined roles that are available with your application.
The New User Role page opens when you click the New PermiTrack-ESC Role link near the top of the Role List page ().
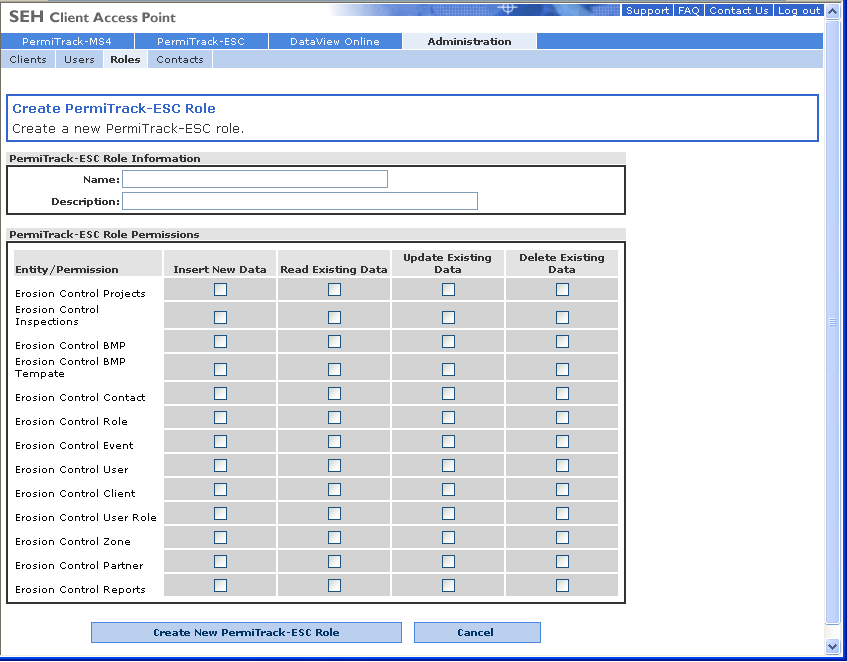
Figure 19. Create PermiTrack-ESC Role page
Fields & Options on the New User Role page
-
Name
: Enter a descriptive name for the role. You will select the role by name when assigning it to an individual user.
-
Description
: Type a description for the role, how it is used, and so on.
-
 Insert New Data
checkbox: Select one or more check boxes in the Insert New Data column to give the users permission to add new projects, inspections, BMPs, and so on. A user assigned to this role can create new items only if the corresponding check box is selected.
Insert New Data
checkbox: Select one or more check boxes in the Insert New Data column to give the users permission to add new projects, inspections, BMPs, and so on. A user assigned to this role can create new items only if the corresponding check box is selected.
-
Read Existing Data
checkbox: Select one or more check boxes in the Read Existing Data column to give the users permission view information in the corresponding records. These users only view the information, not add or change it.
-
Update Existing Data
checkbox: Select one or more check boxes in the Update Existing Data column to give the users permission both view and modify information in the corresponding records. These users only view or change the information; they cannot setup new records.
-
Delete Existing Data
checkbox: Select one or more check boxes in the Delete Existing Data column to give the users permission delete the corresponding items.
-
Update PermiTrack-ESC Role
button: Click the Save button to save your changes and create the role.
-
Cancel
button: Click the Cancel button to discard or remove your changes. The role is not created.
View PermiTrack-ESC User Role page
Use the View User Role page to view the permissions assigned to the selected group.
The View User Role page opens when you click the name of a role on the View User Roles page ().
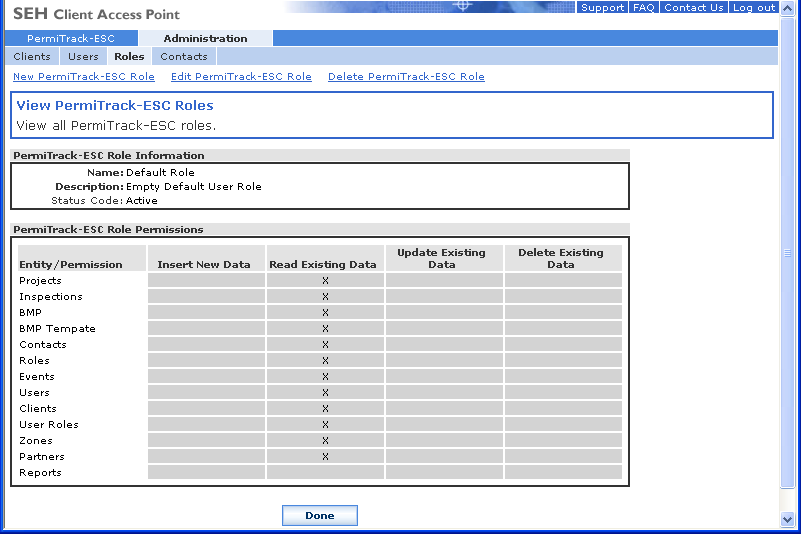
Figure 20. View PermiTrack-ESC Roles page
Links on the View User Role page
-
New PermiTrack-ESC Role
: Click the New PermiTrack-ESC Role link to set up a new role and define the permissions assigned to that role. After setting up a new role, it can be assigned to users. The Create PermiTrack-ESC Role page () opens.
-
Edit PermiTrack-ESC Role
: Click the Edit Role link to edit or update the role displayed on this view page. For example, use this option to change the permissions available to this role. The Edit PermiTrack-ESC User Role page () opens.
-
Delete PermiTrack-ESC Role
: Click the Delete Role link to delete the role displayed on this view page. The Delete User Role page () opens.
Edit PermiTrack-ESC Role
page
On the Edit PermiTrack-ESC Role page, you can change the permissions assigned to a specific role used for the PermiTrack-ESC application. For example, you can let the user view, edit, and delete items in PermiTrack-ESC or limit the user to simply viewing records. These changes are in effect the next time a user assigned to the role logs in to the PermiTrack-ESC application.
The Edit PermiTrack-ESC Role page opens when you click the Edit link to the right of a role on the View User Roles page ().
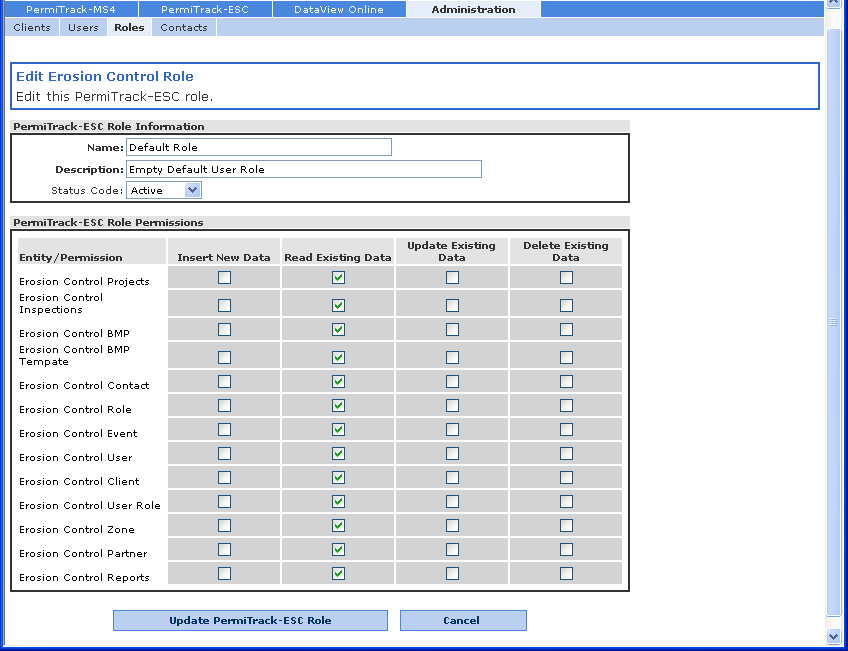
Figure 21. Edit PermiTrack-ESC Role page
Fields on the Edit User Role page
Information on the Edit PermiTrack-ESC Role page was entered when the role was created. See the New PermiTrack-ESC Role page () for the descriptions of these fields.
Buttons on the Edit User Role page
-
Update PermiTrack-ESC Role
button: Click the Update PermiTrack-ESC button at the bottom of the page to save the changes you made on this page.
-
Cancel
button: Click Cancel button to delete or cancel any changes you made on this pages. The changes are not saved.
Delete User Role page
The Delete User Role page lets you confirm that you want to delete this role before deleting the record. If you clicked the Delete link on another page in error, the role is not deleted until you click the Delete PermiTrack-ESC Role button on this page.
The Delete User Role page opens when you click the Edit link to the right of a role on the View User Roles page ().
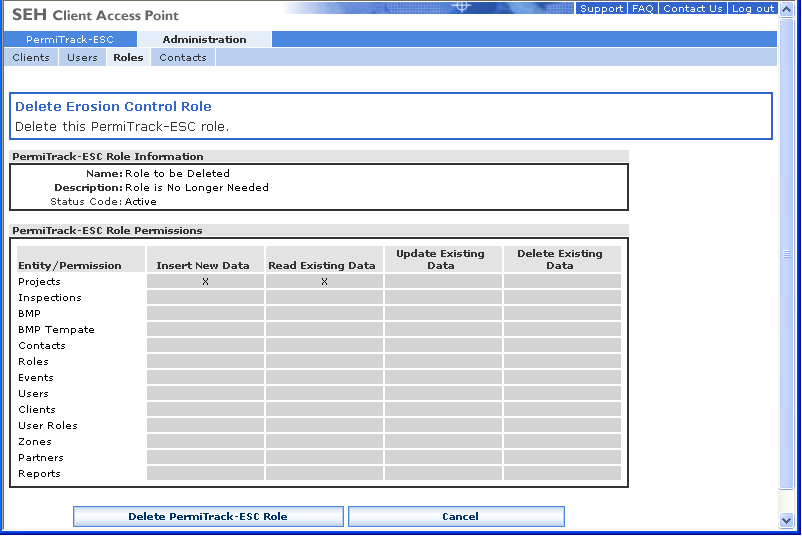
Figure 22. Delete Erosion Control Role page
Buttons on the Delete User Role page
-
Delete PermiTrack-ESC Role
button: Click the Delete PermiTrack-ESC Role button to permanently delete the role displayed on this page.
-
Cancel
button: Click the Cancel button to close this page without deleting the role.
Contacts tab
The Contacts tab lists all of the contact people associated with the current client. Users are automatically added to this list when they are added through the Users tab.
Contact List page
The Contact List page lists the contacts for organizations that can be selected in the PermiTrack-ESC application. From this page, you can add, edit, or delete contacts.
The Contact List page opens when you click the Contacts tab from the View Client page ().
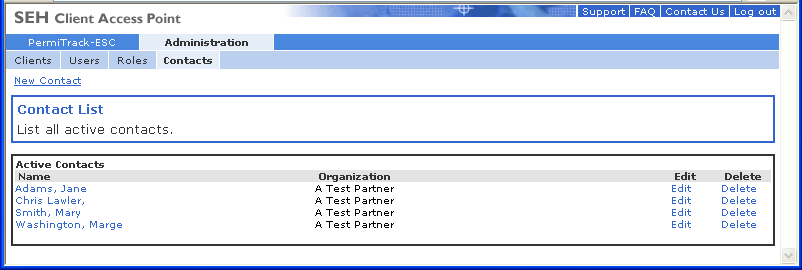
Figure 23. Contact List page
Links on the Contact List page
-
New Contact
: Click the New Contact link below the tabs to add a new contact to the list. The New Contact page () opens.
-
Name
: Click the name of a contact person in the Name column to view more detailed information for that contact. The Contact View page () opens.
-
Edit
: Click the Edit link to the right of the contact Name and Organization to edit or update the information for that contact person. The Edit Contact page () opens.
-
Delete
: Click the Delete link to the right of the contact Name and Organization to remove the contact person from the list of contact people associated with the current client. The Delete Contact page () opens.
New Contact page
On the New Contact page, enter the name, organization, address, and so on for the contact you are adding to the list. After adding a contact, you can choose this contact in the list of Contacts for a PermiTrack-ESC project.
The New Contact page opens when you click the New Contact link at the top of the Contact List page ().
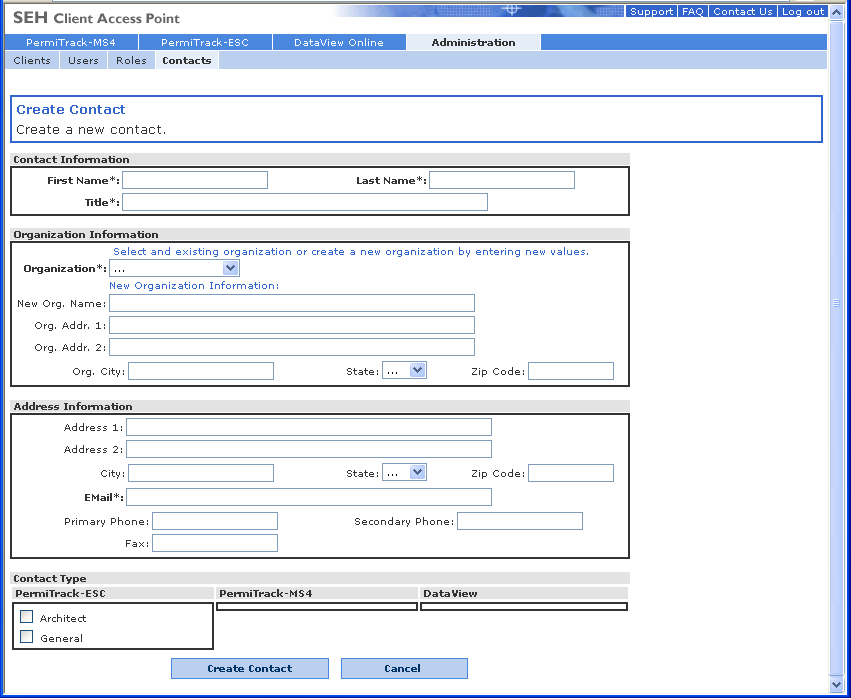
Figure 24. New Contact page
Fields on the New Contact page
-
Contact Information
-
First Name
: The first name of the contact person.
-
Last Name
: The last name of the contact person.
-
Title
: The contact person’s position or job title.
-
Organization Information
In this section, record contact information for the contact’s main office.
-
Organization
: The name of the organization, company, or agency that the contact represents. This drop-down list includes all of the clients displayed on the Client List page.
Select from the drop-down list to assign this contact to one of the current organizations or enter a new organization name if the field below.
-
New Org. Name
: Enter the name of the contact’s organization, if it does not appear in the drop-down list above.
Note
: To use this field to add a new organization, “…” must be selected in the Organization drop-down list.
-
Org. Addr. 1
: First line of the address for the new organization you are adding.
-
Org. Addr. 2
: Second line of the address for the new organization you are adding.
-
Org City, Org State, Zip Code
: City, state, and zip code for the new organization you are adding.
-
Address Information
Enter the address for the contact in this section. The address for the contact’s organization was listed above.
-
Address 1
: The first line of the contact’s mailing or street address.
-
Address 2
: The second line of the contact’s mailing or street address.
-
City, State, Zip Code
: City, state, and zip code for the contact’s address.
-
Primary phone
: The primary phone number for the contact. For example, this may be the contact’s direct number or the main phone number for the contact’s organization.
-
Secondary phone
: A secondary phone number for the contact. This may be the contact’s cell phone number, or the contact’s direct number if the organization’s number is listed above.
-
Fax
: Fax number for the contact.
-
Contact Type
 Architect
: Select the Architect checkbox if the contact is an Architect
Architect
: Select the Architect checkbox if the contact is an Architect
Builder
: Select the Builder checkbox is the contact is a Builder.
Designer
: Select the Designer checkbox is the contact is a Designer.
Genera
l: Select the General checkbox if the contact’s role in the organization is anything except one of the other options.
View Contact page
On the Contact View page, you can review the contact’s information or select one of the links to edit or delete the current contact.
The View Contact page opens when you click the name of a contact organization on the Contact List page ().
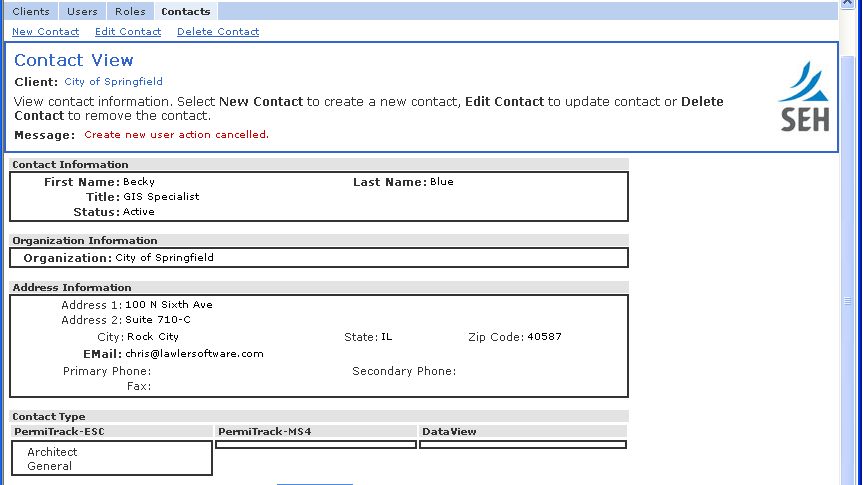
Figure 25. View Contact page
Links on the View Contact page
-
New Contact
: Click the New Contact link below the tabs to add a new contact person to the client. The New Contact page () opens.
-
Edit Contact
: Click the Edit Contact link below the tabs to edit or update the information for the current contact person. The Edit Contact page () opens.
-
Delete Contact
: Click the Delete Contact link below the tabs to remove the current contact person from client. The Delete Contact page () opens.
Edit Contact page
On the Edit Contact page, update the contact’s information, including the name, address, and so on. If the contact for an organization changes, but not the address information, you can change the contact’s name on this page, without creating a new record.
The Edit Contact page opens when you click the Edit link to the right of the name of a contact organization on the Contact List page ().

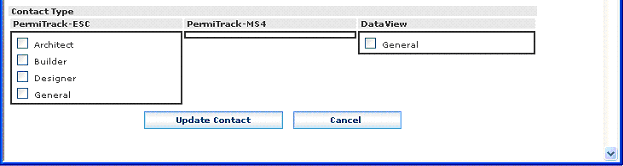
Figure 26. Edit Contact page
Fields on the Edit Contact page
Information on the Edit Contact page was recorded when the contact was entered into the system. See the New Contact page () for descriptions of these fields.
Buttons on the Edit Contact page
-
Update Contact
button: Click the Update Contact button to save your changes to the contact’s record.
-
Cancel
button: Click the Cancel button to discard your changes without saving.
Delete Contact page
The Delete Contact page lets you confirm that you want to delete this contact before deleting the record. If you clicked the Delete link on another page in error, the role is not deleted until you click the Delete Contact button on this page.
The Delete Contact page opens when you click the Delete link to the right of a contact name on the Contact List page (). You return to the Contact List page after the contact is deleted or if you click the Cancel button.
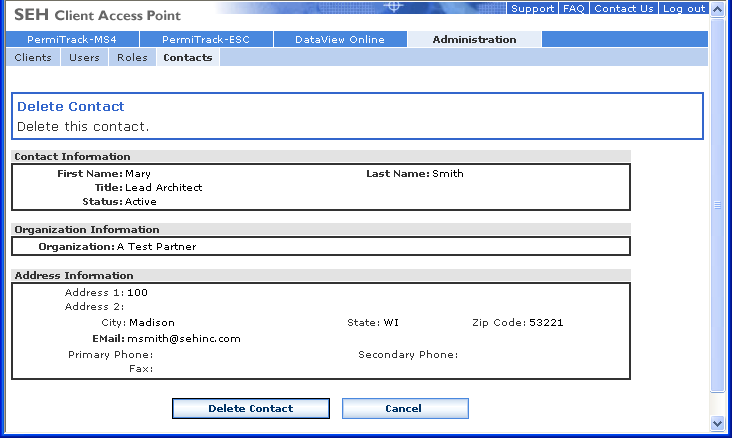
Figure 27. Delete Contact page
Buttons on the Delete Contact page
-
Delete Contact
button: Click the Delete Contact button to permanently remove the contact person from the client.
-
Cancel
button: Click the Cancel button to close this page without deleting the contact. You return to the Contact List page.
Index
A
add
client contact person · 8
contact · 38
user · 25
user role · 32
user role for PermiTrack-ESC · 9
user to client site · 7
Administration tab
Client Administrator · 15
login · 4
Administration tab for the User · 10
C
change
user password · 7
Change Password page · 13, 29
client
edit or update information · 17
view information · 15
Client – DataView Online page · 20
Client – PermiTrack-ESC page · 21
Client Administrator
Administration tab · 15
client contact
add · 8
client logo · 22
computer
parts of main screen · 5
contact
delete · 42
edit · 40
view information · 40
contact information
for user · 11
contact information for user · 10
Contact List page · 37
Contacts tab · 37
Create PermiTrack ESC Role page · 32
Create User page · 25
D
DataView Online page · 20
Delete Contact page · 42
Delete User page · 30
Delete User Role page · 36
E
Edit Client – PermiTrack-ESC page · 21
Edit Client page · 17
Edit Contact page · 40
Edit PermiTrack-ESC Role page · 35
Edit User page · 11, 28
e-mail address
PermiTrack-ESC · 21
update for PermiTrack-ESC · 8
G
Getting Started · 4
L
list
of users · 24
list
of contacts · 37
login · 4
Logo page · 22
N
New Contact page · 38
O
Opening page · 10, 15
P
password
change · 29
Client Admin changing for user · 7
password changed by user · 13
PermiTrack-ESC
e-mail address · 21
PermiTrack-ESC page · 21
R
reset password · 29
role
add new · 32
delete · 36
edit or update · 35
view information · 34
view list of user roles · 32
Role List page · 32
Roles tab · 32
U
user
add new · 25
add to client site · 7
change password · 13, 29
delete · 30
edit contact information · 11
edit or update · 28
list of users · 24
view contact information · 10
view information · 27
User List page · 24
user role ·
See
role
add for PermiTrack-ESC · 9
User View page · 27
Users tab · 24
V
view
client information · 15
View Client page · 15
View Contact page · 40
View User page · 10
View User Role page · 34
W
website logo · 22
Error! Reference source not found.
| page