This manual describes the various components of PermiTrack ESC and is intended for all users of our Erosion Control (ESC) product, including Client Administrators
Use our Quick Start just below, or see more detailed Help information below.
PermiTrackESC lets you create projects that define work you are tracking, record or edit site inspections, categorize projects, define BMPs (Best Management Practices) to be required at project sites, and other key parts of your permit tracking effort.
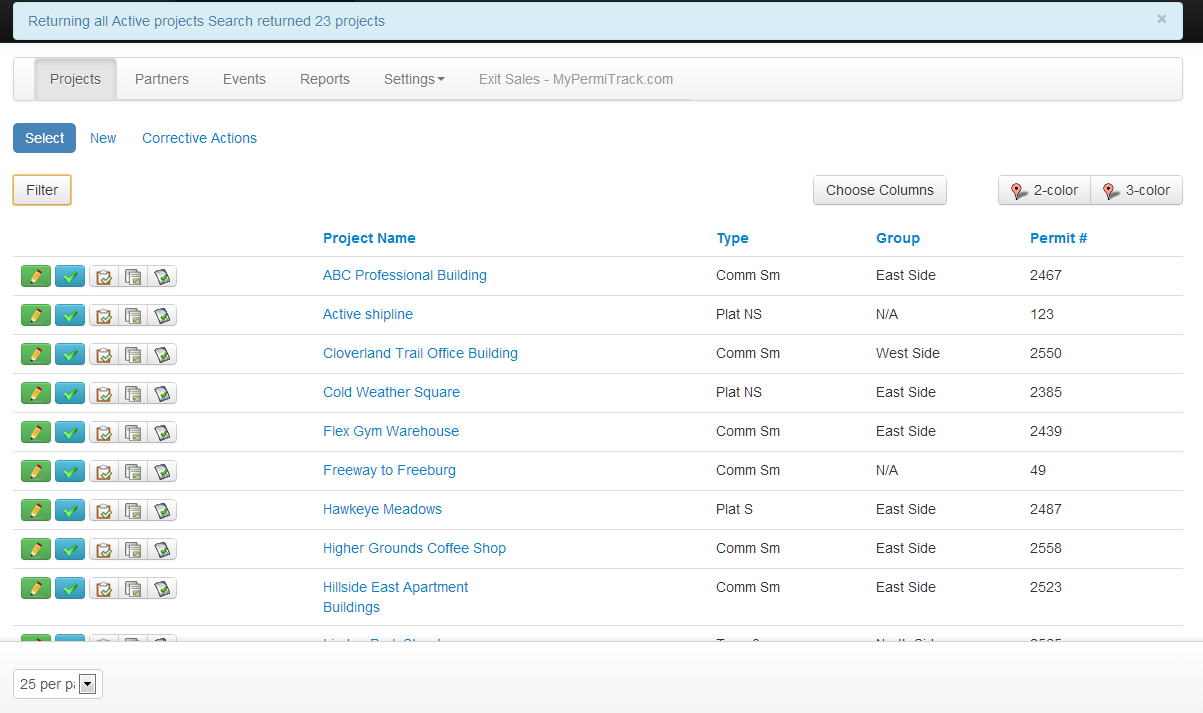
Figure 1. Projects tab
The buttons on the left let you perform a specific task for the item in that row.
![]() New Inspection icon to create a new inspection for that project.
New Inspection icon to create a new inspection for that project.
Click the inspection icons to inspect a project or view the inspection history.
Use column headers to sort the list of projects by that column. Click the same column again to do a reverse sort.
Before creating a new project, you must set up the Project Types, Partners, and BMPs (Best Management Practices) that you will utilize within each project.
Project types identify projects with a shared characteristic. For example, the type may be used to identify a residential site of less than one acre or a commercial site with more than five acres.
Use groups to easily distinguish projects based on a specific feature, location, or other factor. For example, you can create a group for each inspector or for each area of the city. To set up a group to use with your projects:
Groups can reflect any category or characteristic you want to use for organizing groups. For example, set up a group for the East, West, North, and South sides of town.
BMPs identify a type of erosion control measure that you want to specify for one or more projects.
For example, set up a BMP to require a silt fence, temporary seeding, sediment basin, etc. The BMPs are selected during the project setup and are reflected on the inspection form for the project. A BMP can also be added to a specific inspection, as needed.
Inspection Templates let you group BMPs that are commonly applied together or at the same type of Project or Project site.
Templates are not required, but they do help you quickly assign multiple BMPs to a project. When you choose a Template for a given Project, all of the BMPs associated with the Template are assigned to the Project.
Partners are the organizations or companies that play a role in your project.
Set up at least one partner that you will assign to the project as a permittee, permit authority, or authorized inspector. (See Terminology for definitions of these roles.)
Projects are individual construction projects or sites that you want to track and inspect. To create a new project:
The detailed information for each project is available from the Project List page:
 Edit icon next to the project name.
When unusual rainfall or a drought situation calls for additional inspections, create an Event Notification for selected projects and require additional inspections.
To record an event and notify project
Projects are construction projects or work sites that need to be inspected for erosion control. To help you track projects, permit information, contacts, and inspections, you create new projects, and then view them from the Project List page. Inspections let you log observations and critical data from a visit to the project site. The inspection record includes the time and date, pertinent weather information, photos (if needed), compliance with recommended practices, etc.
The Projects page shows all of your construction projects, along with key information for each project. From this page, you can view more detailed information for a project, add a new project, record an inspection, or generate a report for an individual project.

 Collapse/Expand
: Click the Collapse button to shrink the Search region. Click Expand to view the Search region fields.
Collapse/Expand
: Click the Collapse button to shrink the Search region. Click Expand to view the Search region fields.
Use the search function to filter your project list results.
You may use any combination of fields to narrow your search:
The Advanced Search Options can be expanded by use of the Expand button.
You may use any combination of fields to further narrow your search:
Use the icons in the Options column to edit, inspect, view inspection history, or generate a report for the project in that row.
Edit
: Open the project so you can update or change the information.
 Inspect
: Record an inspection for this project. The inspection can include notes and photos.
Inspect
: Record an inspection for this project. The inspection can include notes and photos.
 Inspection History
: View a list of the inspections completed for this project. From the Inspection List, you can edit or view the detailed information for each inspection.
Inspection History
: View a list of the inspections completed for this project. From the Inspection List, you can edit or view the detailed information for each inspection.
 Project Report
: View or save a report that lists key information for the project.
Project Report
: View or save a report that lists key information for the project.
 Inspection Form
: Open a copy of the inspection form that can be printed and filled out in the field. This form does not include any information from past inspections.
Inspection Form
: Open a copy of the inspection form that can be printed and filled out in the field. This form does not include any information from past inspections.
For a description of the columns available on the Project List page please refer to the Preferences page (on page ).
Note : To sort the list by a characteristic, click a column heading to arrange the list in alphabetical or numerical order. For example, click the Type column heading to sort all of the projects by type. Clicking a column heading a second time reverses the sort order.
Links across the top of the Project List page include:
To create or set up a new project, click the New Project link on the Project List page. After setting up a project, you can track the project and record site inspections.
The topic below includes information about the contents of the New Project page. For information on how to set up a new project, see Getting Started –Preparing to Create Projects .
On the New Project page, you record information about the parcel, select a project type, and assign templates, as part of creating a new project. The New Project page is the first of two pages for entering new project information.
The New Project page opens when you click on the New Project link near the top of the Project List page ().
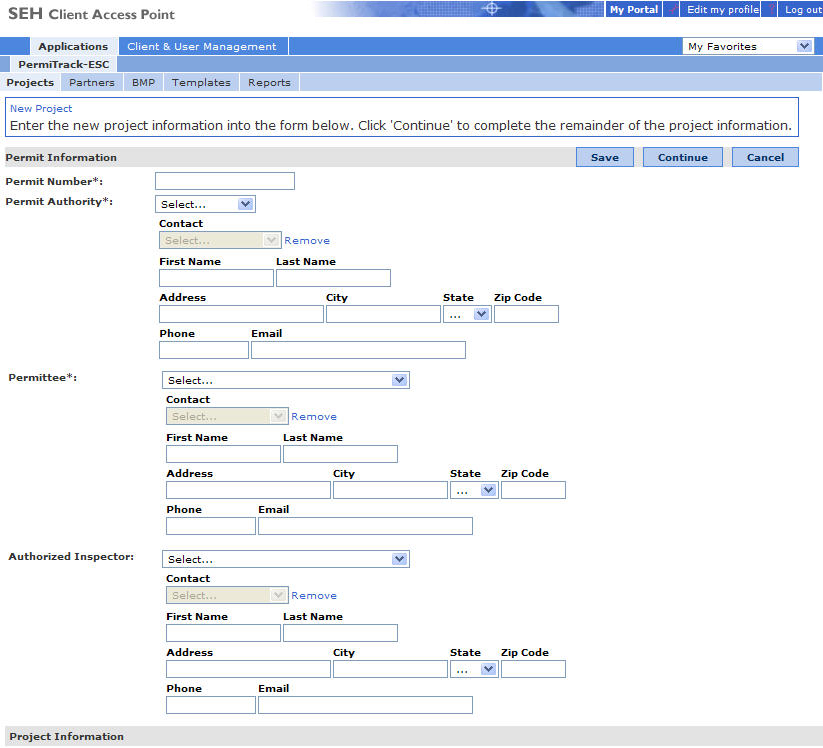
Figure 6. New Project page
Note: See Terminology for more information on these roles.
 Calendar icon to enter the date.
Active : The project is actively being tracked. Inspections can be recorded for this project. The project must be set to Active in order to display the interactive map
Inactive: The project setup is incomplete or the project has been put on hold.
An inactive project is not available through the public-access maps.
Deleted: The project has been deleted.
A deleted project is not available through the public-access maps.
Incomplete : The project is currently incomplete.
Archived : The project has been archived.
Closed : The project has been closed.
Auto-Activate : The project is currently inactive, but it will automatically switch to Active status once an inspection is submitted for the project.
Complete : The project is complete and has been closed. An email will be sent out to those on the email notification list letting them know that the project is complete and closed.
Calendar icon to enter the date.
Calendar icon to enter the date.
Calendar icon to enter the date.
Lookup Coordinates button: If parcel coordinates have been imported, click this button to automatically enter the Latitude and Longitude for the property.
For information on importing parcel coordinates, see
Coordinates
.
Note : In order to display the project on map available to the general public, the latitude and longitude coordinates must be entered on this page. The project must also be in “Active” status to be displayed on the map.
Note : Latitude and longitude can be obtained by visually identifying the project location on a Google™ map. Digital coordinates will be displayed when you right-click the mouse and select “To here” or “From here”.
Documents (such as, permit documentation, construction plans, photos, or other documents) can be added to the project and viewed at any time.
Note : You also can attach a photo of the site as part of logging an inspection.
Use this area to record contact information for a person associated with the project. This area of the page expands to let you record the name, address, phone, and email for the organization and contact person.
Note: The contact information is for reference only. It does not create an account for this person on the PermiTrackESC site.
These fields are displayed when you add a contact:
Note : This list of contact organizations and names of contact people are set up through the Client & User Management | Contacts tab.
Nam e : Name of the contact person at the permit authority.
Address, Phone , and Email : Address, phone, and email for the contact person.
On the New Project - BMP page, you can add individual BMPs to the project. On the first page of the project setup, you had an opportunity to assign a template (with its BMPs) to the project.
The New Project - BMP page opens when you click on the Continue button on the New Project page ().
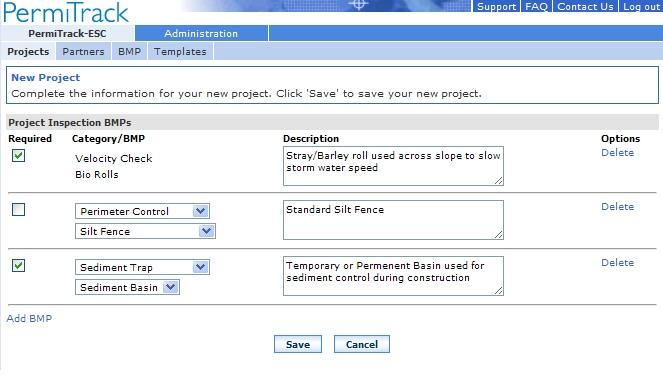
Figure 7. New Project – BMP page
This area lists all of the BMPs assigned to the project. BMPs are associated with the project when the project is created or edited.
You can also add individual BMPs on the inspection form. However, BMPs added during the inspection are only associated with that specific inspection. The Permit Authority can add a BMP to the project, which will display for all inspections using the Edit Project function.
These fields are displayed when a BMP is added to the project:
 Required: Select this check box to require this BMP for the project inspection. The Permittee or Authorized Inspector must inspect this item.
The Permit Authority can complete an inspection without inspecting this BMP, if applicable.
(See
Terminology
. for descriptions of these roles.)
 Required
: Clear this check box to
recommend
but
not require
this BMP for the inspection.
Required
: Clear this check box to
recommend
but
not require
this BMP for the inspection.
Links across the top of the page include:
On the Send Project Notification Emails page, select the project contacts who should receive an email message that the project was added or updated, along with a report of the project in PDF format. You can skip the email by clicking the Skip button.
The Send Project Notification Emails page opens when you save a new project or save changes to an existing project.
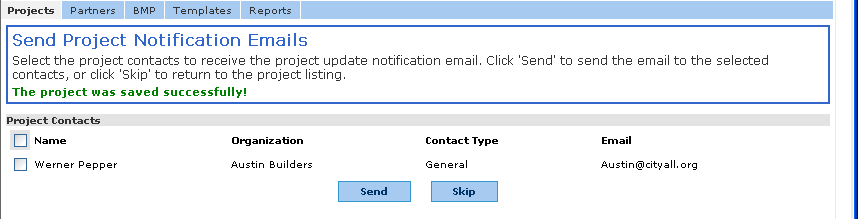
Figure 8. Send Project Notification Emails page
Select the check-box to send an email to this person to notify them that the project has been added or updated.
Clear the check-box to exclude the contact from the email distribution list for changes to the project.
On the Edit Project page, you can change the project name, description, or other information. For example, use this page to change an inactive project to an active project when its setup is complete.
The Edit Project page opens when you click the
Edit icon next to a project name on the Project List page ().
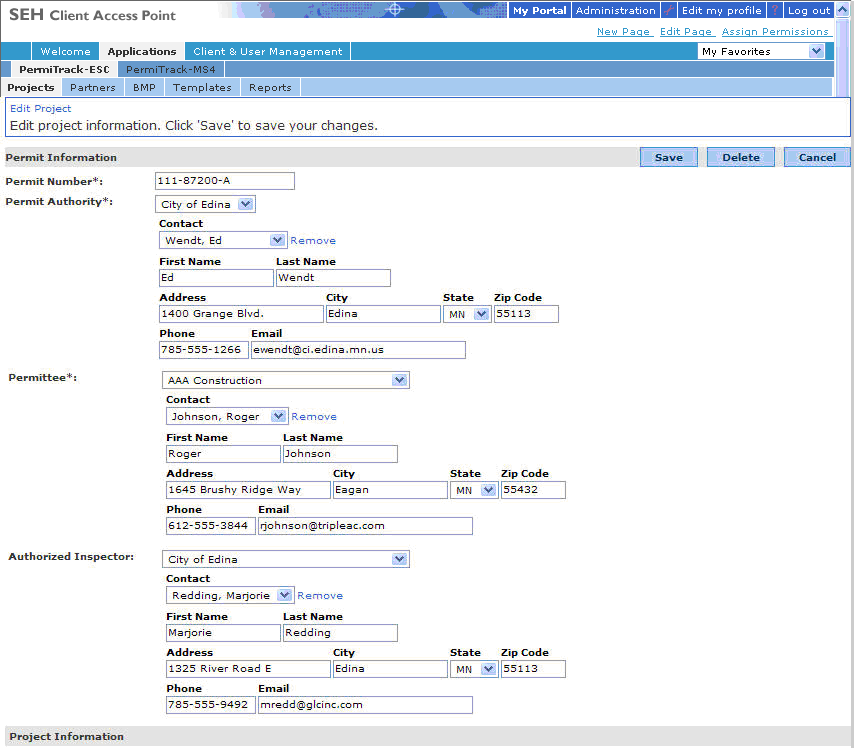
Figure 9. Edit Project page
The fields on the Edit Project page are the same as those completed on the Create New Project page (see page ).
Buttons on the Edit Project pageOn the Project Information page, you can view the detailed information for the project. The Project Information page opens when you click the name of a project on the Project List page ().
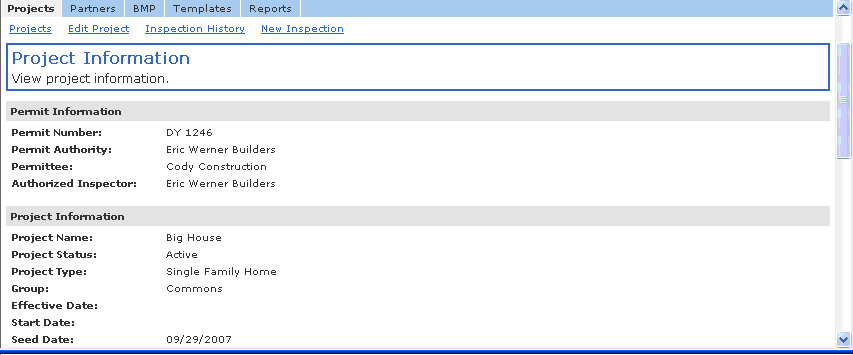
Figure 10. View Project Information page
Information displayed on this page was entered when the project was created or edited. For information on each field, see Create New Project page (see page ).
Inspections are recorded for each project by logging in to the program from a PDA or from a computer. For the inspection, you record weather data, specify the reason for the inspection, note compliance with BMPs required for the project, and attach a photo (if appropriate). You can also add new BMPs to an individual inspection record, as needed.
The schedule for conducting inspections can be determined by the inspector or triggered online by recording a weather event. (For more information on requiring an inspection in response to an event, see page .)
Recording an inspection:
Inspect icon next to the project name on the Project List page ().
On the Create a New Inspection page, you record an inspection of the project site, record pertinent weather data, make notes about compliance with the BMPs, and, if needed, upload a photo to include in the inspection record.
The Create a New Inspection page opens when you click the
New Inspection icon next to a project name on the Project List page () or when you click the New Inspection link on the Inspection List page.
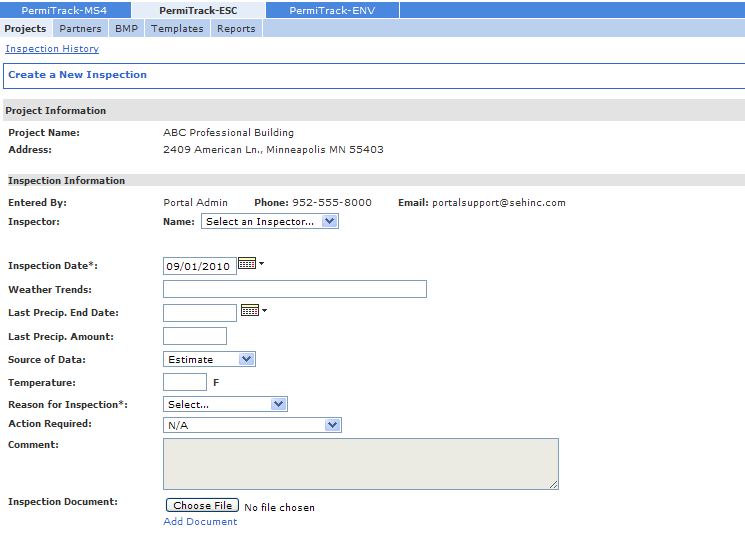
Figure 11. Create a New Inspection page
This area of the page displays the project information so that you can confirm that you are working with the correct project.
Inspection InformationWhen recording a new inspection, enter the following information:
Note : Inspectors that appear in the drop-down list will be contacts for the clients associated with the project that have a contact type of “Inspector”.
Note: The contact information is for reference only. It does not create an account for this person on the PermiTrackESC site.
These fields are displayed when you add an inspector:
Note : The Email information needs to be unique. If this email already exists in the system, you will not be able to save the new inspector information.
Note : Saved Inspectors will appear in that client’s contact list on the Contact page.
Calendar icon to enter the date when the inspection was performed.
Calendar icon to record the last day of the most recent precipitation, if pertinent.
Note: This field is available only to the permit authority. (See Terminology .)
Previous inspection deficiencies are listed if all of the following are true:
This section does not display if this is the first inspection or if there were no deficiencies reported in the last inspection.
Inspection ItemsThe Inspection Items area of the page lists all of the BMPs associated with the project. If a BMP is required, you must record your observations and update the status.
 Yes
: Select Yes if inspector inspected this control measure during this inspection.
Yes
: Select Yes if inspector inspected this control measure during this inspection.
No: Select No if inspector
did not
inspect this control measure during this inspection.
Yes : This control measure is required. It must be inspected.
No : This control measure is not required as part of the inspection. It can be inspected or may be skipped.
Active : BMP is active and should be implemented at this project site.
Inactive : The BMP does not apply to the project site at this time or at this phase of construction.
Completed : Use of this BMP is complete. For example, the project has progressed beyond the need for this BMP, so it is no longer needed at this project site.
N/A : Not Applicable. The BMP does not apply to the project site at this time.
Correct : This control measure is being used or applied correctly at the project site.
Not Applied : This control measure should be in place at the site, but it is not being used at this time.
Ineffective : This control measure is in place at the project site, but it is not effective in providing erosion control.
Note : To add a photo to the inspection record, it must be included under a BMP. To add additional photos from the inspection site, select the Add BMP link at the bottom of the screen. Select “Add Photo”, save, and use to record additional photos.
Note : If the BMP should be part of the project, the Permit Authority can add the BMP to the project so that it is displayed for all project inspections.
Save As Field and Button in the Upper-Right CornerDraft : The inspection record is not complete. Further information will be added later. This status helps you quickly find the draft inspections when you view the Inspection List.
Final : The inspection record is complete. No changes can be made after the inspection is final.
The Inspection List page lists the inspections logged for the current project. Use this list for a quick overview of the inspections on this project, to edit a draft inspection, or to open the record for a specific inspection.
The Inspection List page opens when you click the
 Inspection History icon on the Project List page () or click the Inspection History link on one of the other views.
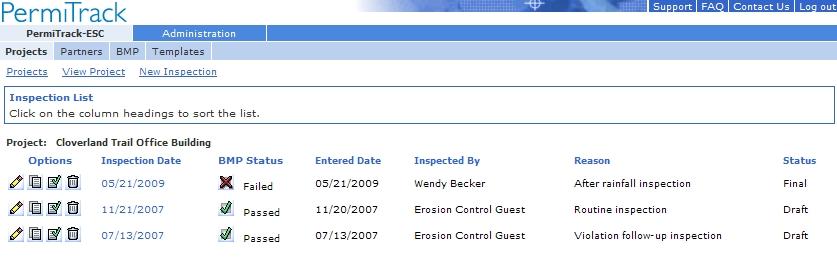
Figure 12. Inspection History List page
Edit
: Open the inspection record so you can update or change the information.
Report
: View or save a report of the inspection. Select open to print the report or select save to save the PDF file to your computer or a network location.
Inspection Form
: Open a copy of the inspection form that can be printed and filled out in the field.
 Delete
: Delete the inspection record.
Delete
: Delete the inspection record.
Draft : The inspection record is not complete. Further information will be added later. This status helps you quickly find the draft inspections when you view the Inspection List.
Final : The inspection record is complete. No changes can be made after the inspection is final.
The View Inspection page displays the information recorded during the inspection you chose on the Inspection List page ().
The View Inspection page opens when you click the date for an inspection on the Inspection List page.
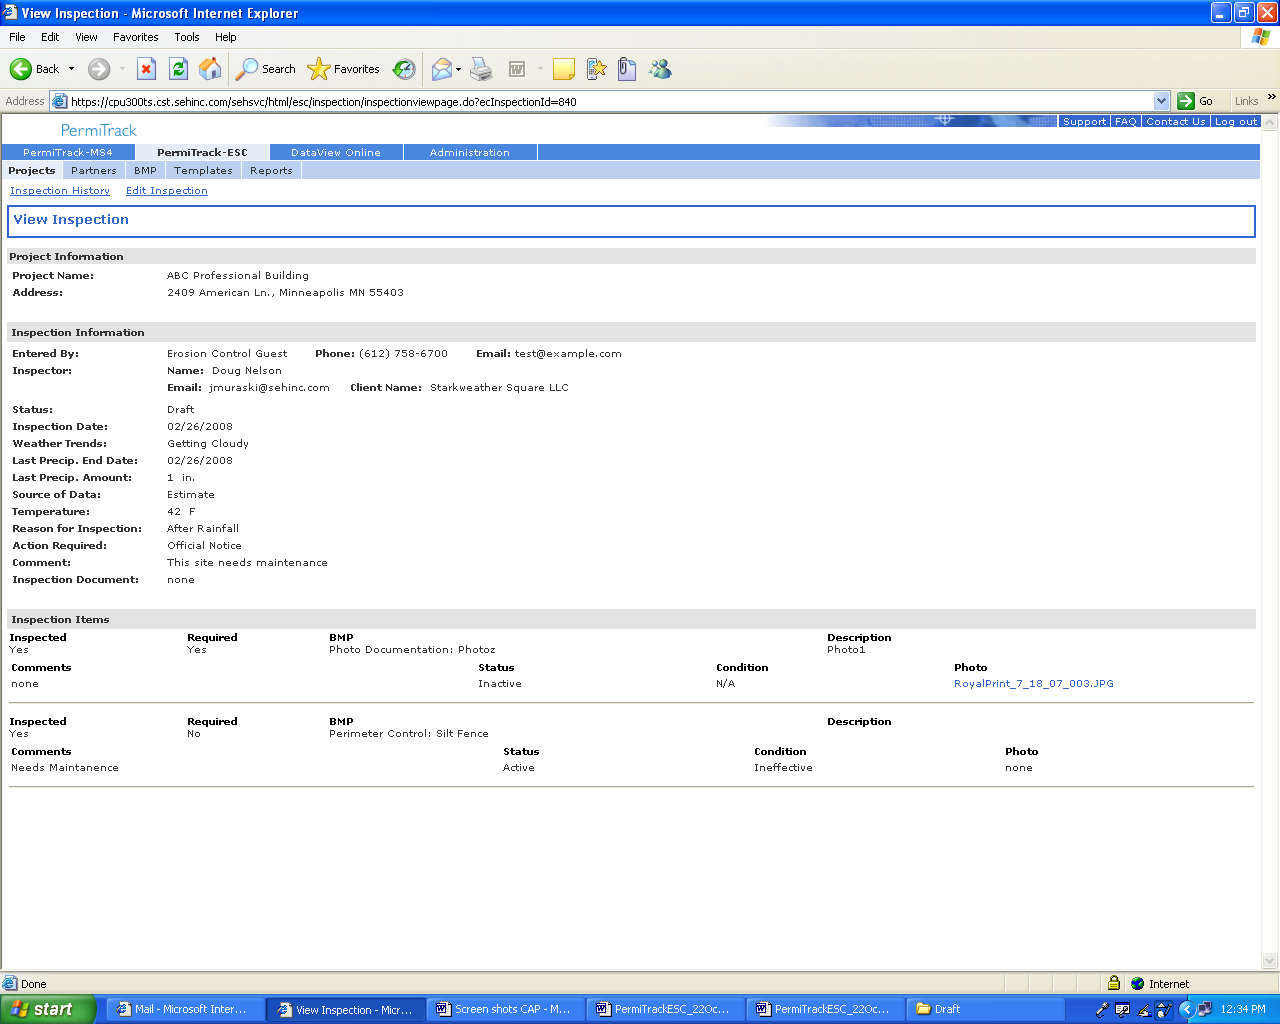
Figure 13. View Inspection page
The fields displayed on this page are the same as those entered on the New Inspection page (see page ).
Use the Edit Inspection page to make changes to a draft inspection record. For example, if you started an inspection record in the field with a PDA, you can verify and update the precipitation data when you return to the office.
The Edit Inspection page opens when you click
Edit icon next to an inspection date on the Inspection List page ().
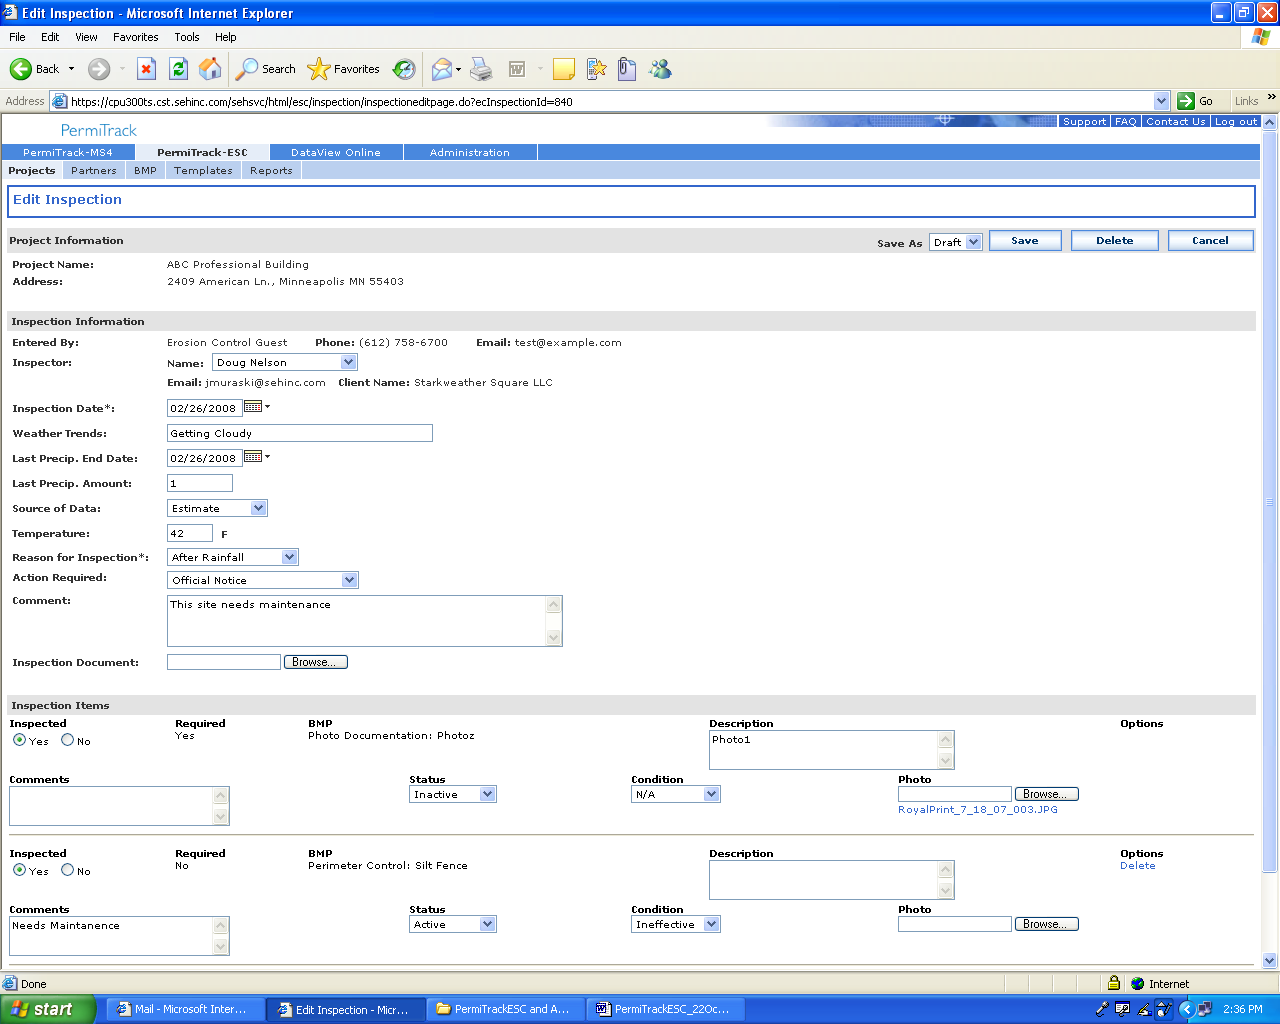
Figure 14. Edit Inspection page
The fields displayed on this page are the same as those entered on the New Inspection page (see page ).
This page intentionally left blank.
Project types provide a way to quickly identify projects by the type (residential versus commercial), size, use of SWMP (Storm Water Management Plan), etc. For example, you could create a type for residential sites of less than one acre or commercial sites with more than five acres. With project types assigned, you can easily group these projects by sorting the Type column on the Project List page ().
Project types may also be used to identify groups of projects for more accurate accounting linked to project size or scope. Project types can be used to administer the number of projects associated with specific characteristics, such as the length of time the project data is stored on the system.
The Project Type can be assigned to a project when it is created or edited.
The Project Types page lists the project types created for your client site. From this page, you set up or edit the project types that can be selected for a new or existing project.
The Project Types page opens when you click on the Project Types link on the Project List page ().

Figure 15. Project Types page
Edit
: Click the Edit icon to modify the any of the information set up for the project type, such as the name, description, end point type, etc.
Delete
: Click the Delete icon to delete the project type in this row.
Note: The Project Type cannot be deleted if there are projects assigned to this type.
On the New Project Type page, you set up a new project type for identifying and organizing projects.
The New Project Type page opens when you click on the New Project Type link on the Project Types list page.
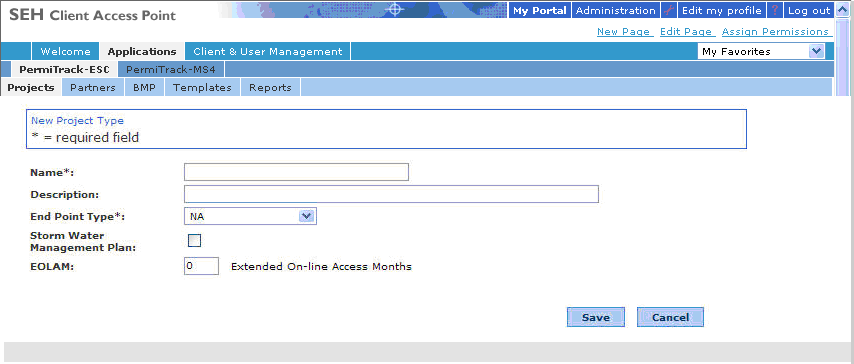
Figure 16. New Project Type page
N.O.T. (Notice of Termination): The project is finished when the N.O.T. is received.
Months from Start : The project will end after a specific number of months.
OCC Permit (Occupation Permit): The project is finished when the OCC Permit is received.
Indefinite : The project is on-going, without a specific end point.
Storm Water Management Plan
: Select this check box to indicate that an SWMP is required.
Storm Water Management Plan
: Clear check box to indicate that an SWMP is not required.
On the Edit Project Type page, you can change the name of the type, its description, or other information. For example, use this page to change the end point type.
The Edit Project Type page opens when you click the
Edit icon next to a type name on the Project Type List page ().
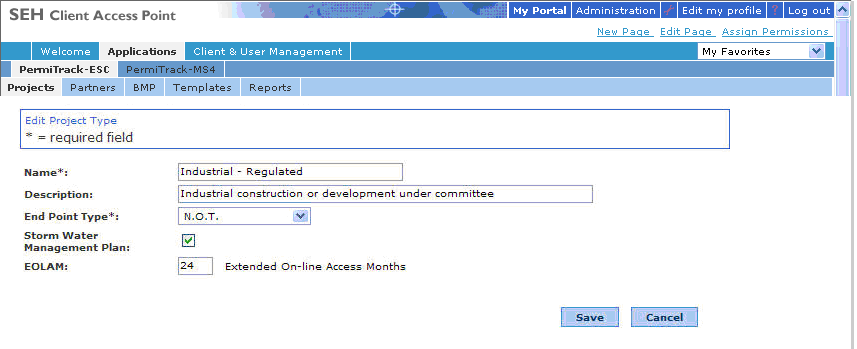
Figure 17. Edit Project Type page
The fields on the Edit Project Type page are the same as those completed on the New Project Type page (see page ).
Use groups to easily distinguish projects based on a specific feature, location, or other factor. For example, you can create a group for each inspector or for each area of the city. After setting up one or more groups, individual projects can be assigned to the group.
To assign a project to the group, select the group name in the Group field on the New Project page () or Edit Project page ().
The Group List page shows the groups created for your client site. From this page you set up or edit the Groups that are available to new or existing projects.
The Group List page opens when you click on the Groups link on the Project List page ().
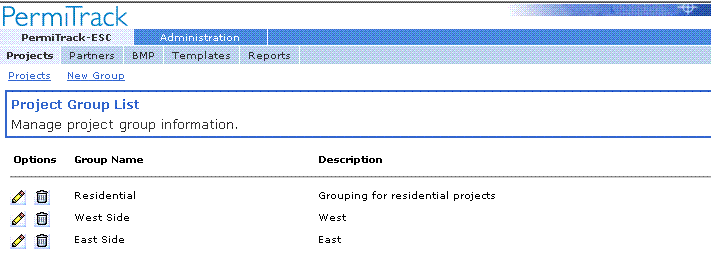
Figure 18. Group List page
Note: Before deleting a group name, you can assign the group's projects to another group.
On the Group Information page, you create or edit a group that can be used for classifying projects based on a shared characteristic like their location, inspector name, etc.
The New Project Group page opens when you click on the New Group link on the Groups List page ().
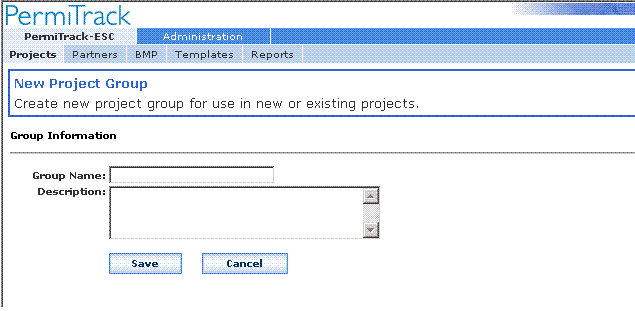
Figure 19. New Project Group page
On the Group Information page, you change the name or description for a group that is used for classifying projects based on a shared characteristic like their location, inspector name, etc.
The New Project Group page opens when you click on the
![]() Edit icon on the Groups List page ().
Edit icon on the Groups List page ().
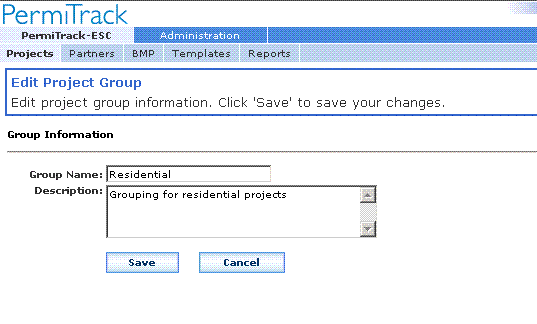
Figure 20. Edit Project Group page
The fields on the Edit Project Group page are the same as those completed on the New Project Group page ().
Before deleting a group, you can assign the group’s projects to another group. For example, if your groups identify the primary inspector, you can move these projects to a different inspector before the group is deleted.
The Delete Group page opens when you click the
![]() Delete icon next to a name on the Groups List page ().
Delete icon next to a name on the Groups List page ().
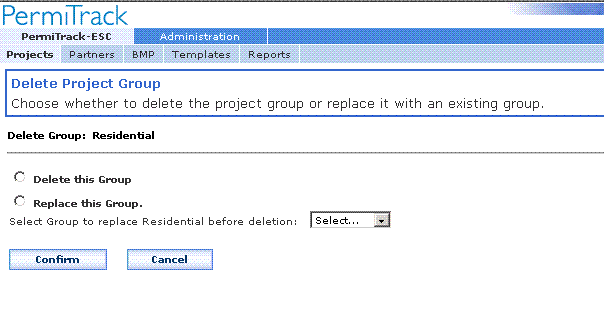
Figure 21. Delete Project Group page
Events are weather related events that may affect erosion control. Setting an event lets you notify the people responsible for projects in the affected area and require inspections of their project sites by a specific deadline. Events also let you track compliance with the inspection deadline.
When the event is created the permittee and authorized inspector associated with the project receive an email message notifying them of the event. They are then required to log into the system and complete an inspection form. For example, if there is a 2 inch rainfall on the west side of town, you can notify all projects in that area.
Afterwards, check compliance with the event inspection is determined through the compliance report.
The Event List shows the events recorded for the client. From this page, you can review an existing event or create a new event.
The Event List opens when you click the Events link on the Project List page ().
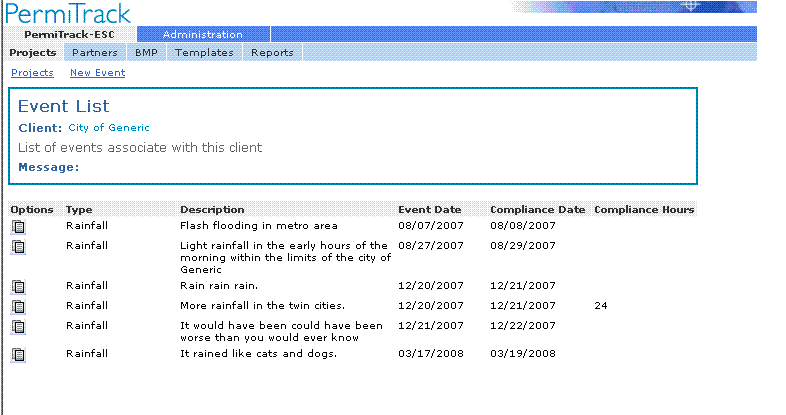
Figure 22. Event List page
Note : The event will have either a Compliance Date or Compliance Hours, but not both.
On the New Event page, you record information about the event and enter the text for the email message to be sent to projects about this event.
The New Event page opens when you click the New Event link on the Event List page.
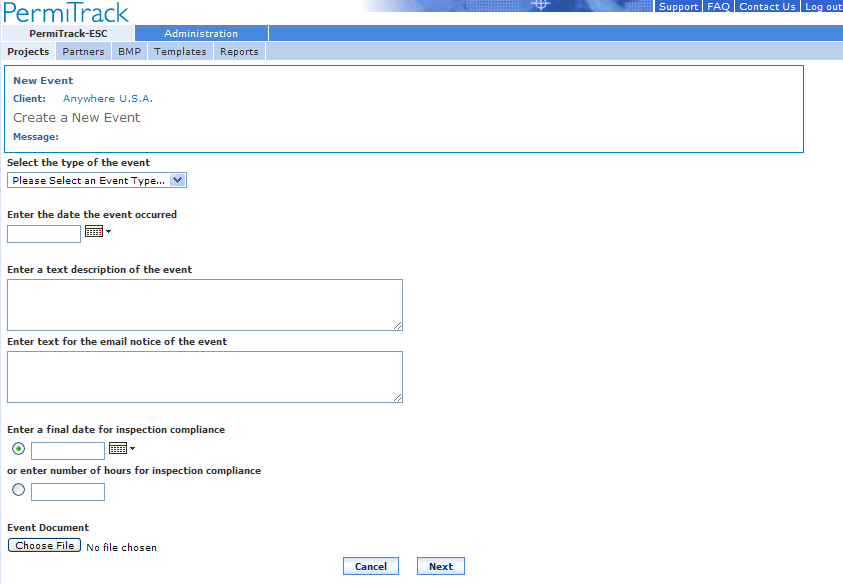
Figure 23. New Event page
Enter a final date for inspection compliance : Enter a date or click the calendar icon to select a date. The inspection must be completed by 12 midnight on the date you specify.
Or enter number of hours for inspection compliance : Enter the number of hours that the inspector has to complete the inspection. These hours are relative to the time the event is created in the system.
On the Project Search page, you enter criteria for identifying the projects that should receive notice of the event. For example, if the rainfall was extremely heavy on the west side of town, only the projects in that area need to be notified. In this example, search by zip code to identify the projects by location or use groups based on location.
The Project Search page opens when you click the Next button on the New Event page ().
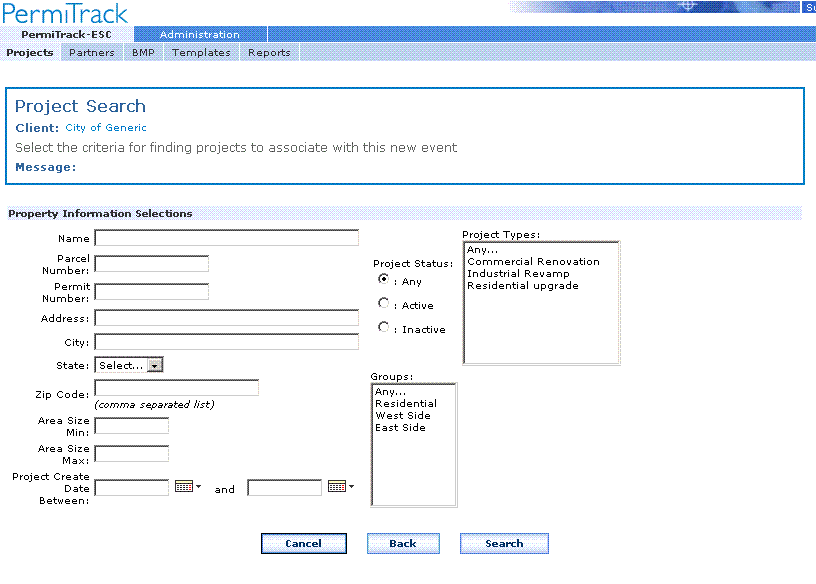
Figure 24. Project Search page
Caution :Clicking the Back button deletes the event information that you entered on the New Event page before coming to this page. If you click the Back button, the event is not created.
The Project Search Results page, lists the projects that match your search criteria. Select the check box next to the projects that should receive an email message about the event. When you click the Create Event button, an email message is sent to the contact person for the permittee and authorized inspector. The event is recorded on the Event List page.
After the event is created, use the Event Compliance Report to identify projects that have not completed an inspection within the required time period.
The Project Search Results page opens when you click the Search button on the Project Search page.
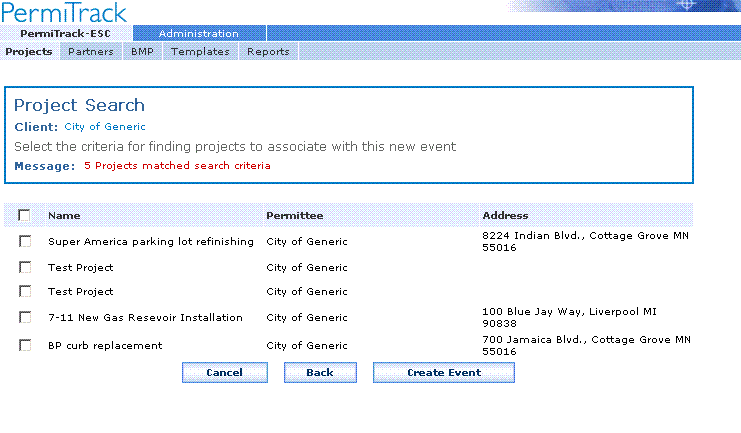
Figure 25. Project Search Results page
![]() Notify
: Select this check box to include the project in the event. The contact person for the project will be notified and the Inspector is expected to complete an inspection. Their compliance is reflected in the Event Compliance report.
Notify
: Select this check box to include the project in the event. The contact person for the project will be notified and the Inspector is expected to complete an inspection. Their compliance is reflected in the Event Compliance report.
![]() Notify
: Clear this check box to exclude the project from the event. The project contacts do not receive notice of the event and are not expected to inspect the project site.
Notify
: Clear this check box to exclude the project from the event. The project contacts do not receive notice of the event and are not expected to inspect the project site.
The Event Compliance Report lists detailed information about the event. Use this report to check whether the projects are incompliance with the event requirements.
The Event Compliance Report page opens when you click the
![]() Report icon next to an event on the Event List page.
Report icon next to an event on the Event List page.

Figure 26. Event Compliance Report page
Coordinates can be used to automatically enter the latitude and longitude for a project when you enter the parcel number. The coordinates for the parcels are uploaded into the system from a text file on your computer or network. After importing the coordinates, you can use the parcel number to automatically add the coordinates to a project when it is being added or edited.
Note :In order to display projects on maps available to the general public, the latitude and longitude coordinates must be entered for the project.
Through the Coordinates page, you locate and upload a text file that contains the parcel numbers and corresponding coordinates. The text file can use a tab or a comma to separate or delimit each of the values. The file must use this format:
Parcel Number <delimiter>Latitude Coordinate<delimiter>Longitude Coordinate
Coordinate values are in decimal degrees format. For example:
Latitude=38.898748
Longitude=-77.037684
The Coordinate Lookup Table Import page is used to upload the file containing parcel numbers and their corresponding coordinates. After uploading this information, it is used to automatically populate the latitude and longitude values for a new project when the parcel number is entered.
The Coordinate Lookup Table Import page opens when you click the Coordinates link on the Project List page ().
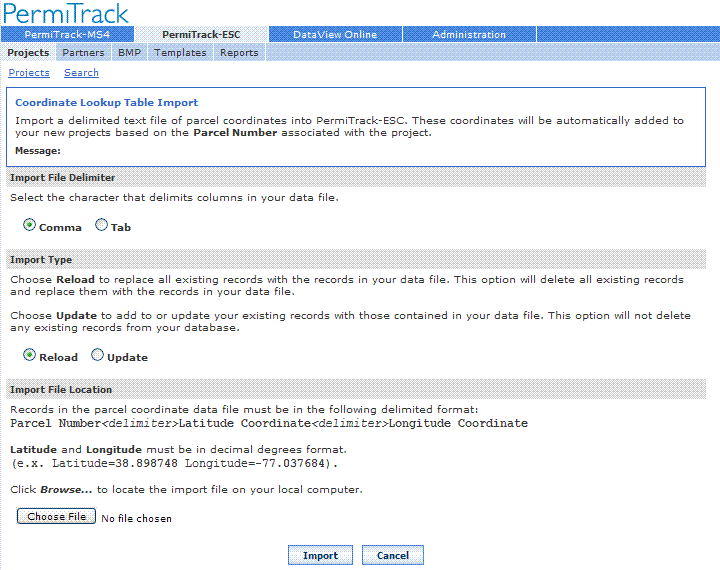
Figure 27. Coordinate Lookup Table Import page
Links across the top of the page include:
Indicate the method for separating values in the coordinate file to be imported.
![]() Comma
: Select Comma if the import file is a comma-delimited file that separates the values with commas.
Comma
: Select Comma if the import file is a comma-delimited file that separates the values with commas.
![]() Tab
: Select Tab if the import file uses tabs to separate the values.
Tab
: Select Tab if the import file uses tabs to separate the values.
Indicate whether the existing values should be replaced or the new values added to the database.
![]() Reload
: Select Reload to replace all existing parcel and coordinate values when you import the file.
Reload
: Select Reload to replace all existing parcel and coordinate values when you import the file.
For example, if a coordinate value exists in the database before the import but a corresponding value is not in the import file, the database value is deleted.
![]() Update
: Select Update to add to and change existing values in the database.
Update
: Select Update to add to and change existing values in the database.
For example, if a coordinate value exists in the database before the import and the corresponding value in the import file is different, the value in the database is changed. Other values in the database remain unchanged.
Use the Coordinate Search page to search the database for the coordinates for a specific parcel.
The Coordinate Search page opens when you click the Search link on the Coordinate Lookup Table Import page.
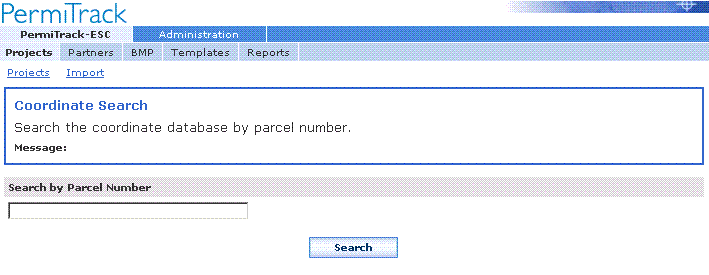
Figure 28a. Coordinate Search page
Links across the top of the page include:
The Coordinate Search Results page lists the parcels identified through your search, along with their corresponding coordinates. On this page, you can view the results, edit the coordinate values or delete a parcel record.
The Coordinate Search Results page opens when you click the Search button on the Coordinate Search page ().
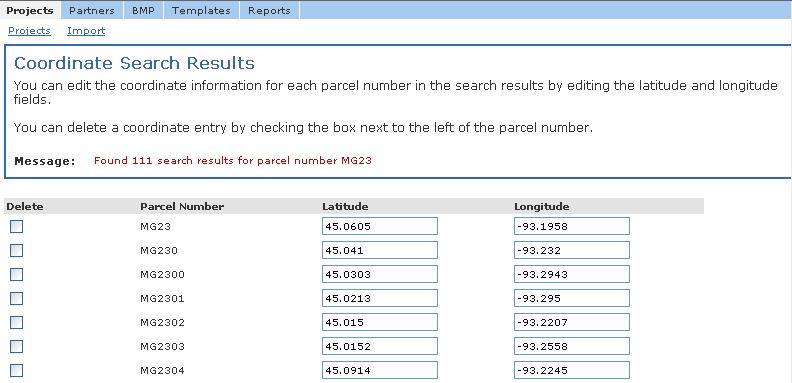
Figure 29b. Coordinate Search Results page
Links across the top of the page include:
![]() Delete
: Select this check box to delete the parcel and its coordinates from the database.
Delete
: Select this check box to delete the parcel and its coordinates from the database.
![]() Delete
: Clear this check box to keep the existing parcel number and its coordinates in the database.
Delete
: Clear this check box to keep the existing parcel number and its coordinates in the database.
Note
:If the old coordinates were used for a project, the project data
does not
change when you make changes and save them from this page.
To update the project data after making a change here, use the Lookup Coordinates button on the
Edit Project page
() to update the parcel coordinates for that project.
This page intentionally left blank.
The Corrective Action List is provides a quick snapshot of Projects in need of attention. Here you will find all projects whose last final inspection contained a ‘Failed’ BMP.
The Corrective Action List page is used to quickly view all Projects that require a corrective action. Projects are listed once for every failed BMP. The BMP Name is displayed, along with BMP Category and Description.
From this screen, the deficient Projects can be viewed, or new Inspections created.
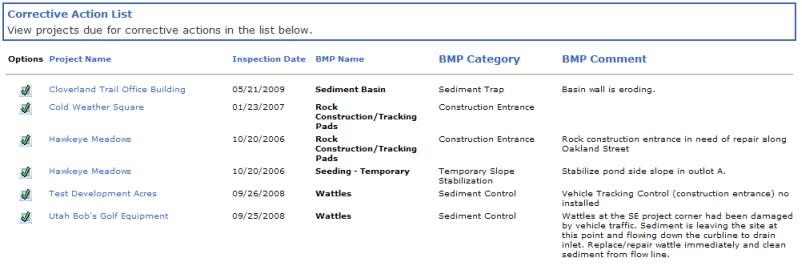
Figure 30. Corrective Action List page
On the My Settings page, you can choose the columns you want to see on the Project List page (). The columns you select appear on the Project List page each time you open PermiTrackESC
The My Settings page opens when you click the My Settings link on the Project List page.
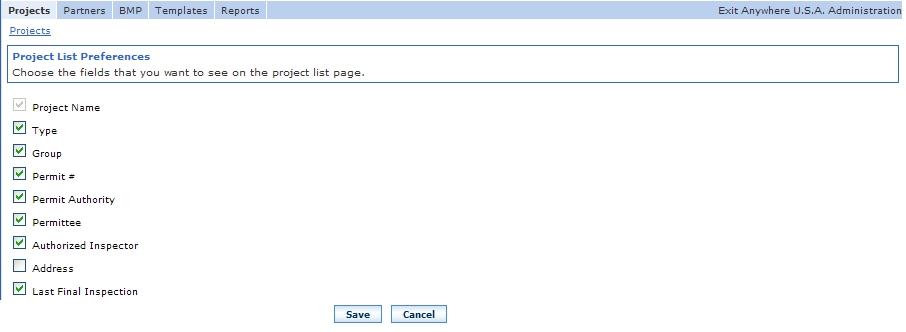
Figure 29. My Settings page
Links across the top of the page include:
Projects : Return to the Project List page.
Select a check box to display that column on the Project List page (). For example:
![]() Type
: The Type column displays on the Project List page.
Type
: The Type column displays on the Project List page.
![]() Type
: The Type column does not display on the Project List page.
Type
: The Type column does not display on the Project List page.
This page intentionally left blank.
Partners are the organizations, companies, or units of government that have a role on a project. Partners may play these roles on a project:
The Partner List shows all of the partners added to your client account. The list includes partners that serve as the permit authority, permittee, or authorized inspector. From this page, you can view more information about a partner, add a new partner, or delete an existing partner.
The Partner List page opens when you click the Partners tab.
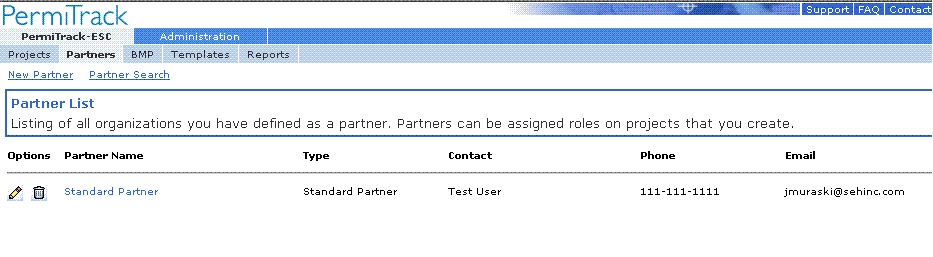
Figure 30. Partner List page
![]() Edit
: Open the partner record so you can update or change the information.
Edit
: Open the partner record so you can update or change the information.
![]() Delete
: Delete the partner from your client site.
Delete
: Delete the partner from your client site.
On the Create a Partner page, you set up a partner that can be serve a role on one or more projects. Adding a partner lets you record their name and address, and identify a primary contact person. The specific role is defined during the project setup.
The New Partner page opens when you click the New Partner link on the Partner List.
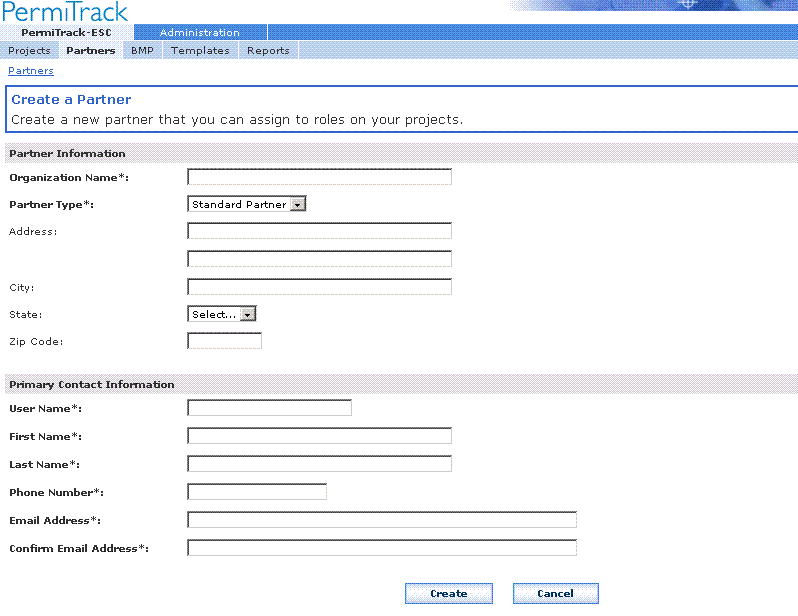
Figure 31. Create a Partner page
Preferred Partner
: A preferred partner has access to all of the features in the
PermiTrackESC
application. A preferred partner can create or edit projects, set up BMPs and templates, create events, setup users, etc.
When you define a preferred partner, that partner can create projects and assign your company as the permit authority.
Standard Partner
: A standard partner has limited access to the application. This type of partner can create and edit inspections, and view project information. They cannot create projects.
This type is typically used for a partner that will be a permittee or authorized inspector.
Use the Search for a Partner page to find the record for a partner that was created by your organization or another organization. For example, ACME Construction Company may do work for more than one client. Rather than re-entering all of the contact information through your site, use the Find Partner feature to look for and add this partner’s information.
The Search for a Partner page opens when you click the Partner Search link on the Partner List (.)
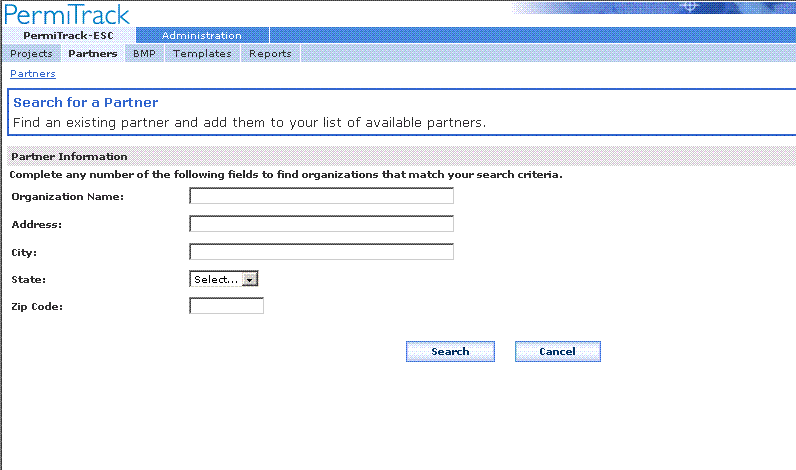
Figure 32. Search for a Partner page
Note :You can enter information in any number of fields. To refine the search, enter information in more than one field.
The Search Results List displays all of the partners that match your search criteria. From this page, you can add an existing partner to your client site or edit partner information.
The Search Results List page opens when you click the Find button on the Search for a Partner page ().
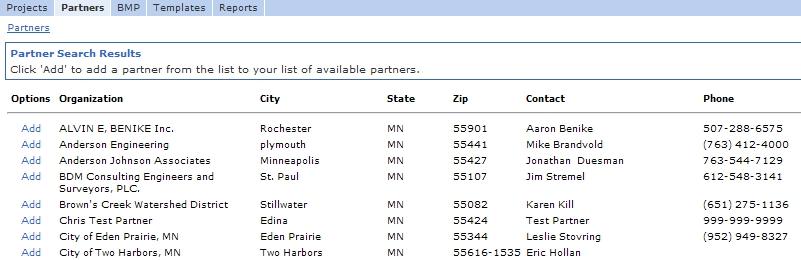
Figure 33. Partner Search Results page
Use the Add a Partner page to add an existing organization as a partner from the Partner Search Results page ().
The system automatically enters most of the partner information. Select the type partner for your site.
Standard Partner
: A standard partner has limited access to the application. This type of partner can create and edit inspections, assign the permit and inspection organizations, and view project information. They cannot create projects.
This type is typically used for a partner that will be a permittee or authorized inspector.
Preferred Partner
: A preferred partner has access to all of the features in the
PermiTrackESC
application. A preferred partner can create or edit projects, set up BMPs and templates, create events, setup users, etc.
This type is typically used for a partner that will be an Permit Authority.
Select the option button next to the name of the person who will serve as the primary contact for this partner. If needed, change the email address in the last field.
Use the Edit Partner page to edit the partner information or to add the partner to your client site. The options available depend on your starting point — either the Partner List or the Search Results List.
The Edit Partner page opens when you click one of the following:
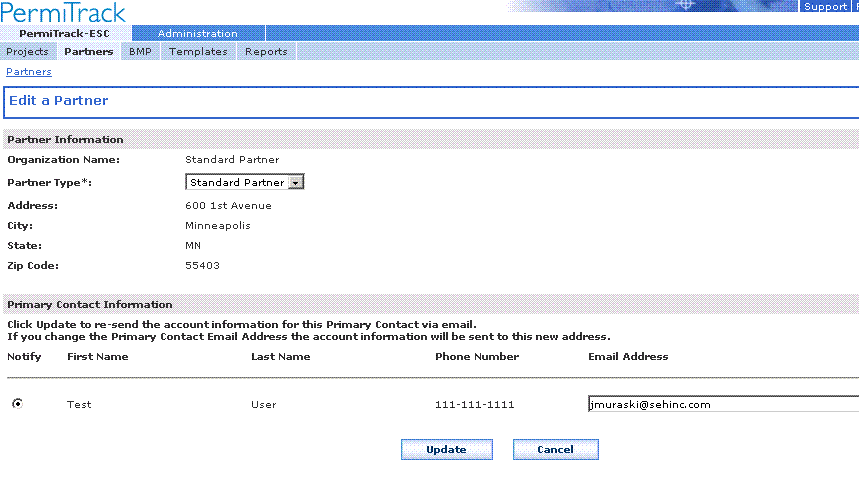
Figure 34. Edit Partner page
The fields displayed on this page are the same as those entered on the Create a Partner page (see page ).
The buttons available on the Edit Partner page depend on your starting point.
Use the Delete Partner page to confirm that you want to delete the partner from your site. For example, if you clicked the Delete button accidentally, this page lets you cancel the delete. After the partner has been removed, it can no longer be assigned to your projects.
The Remove a Partner page opens when you click the
![]() Delete icon next to a name on the Partner List page ().
Delete icon next to a name on the Partner List page ().
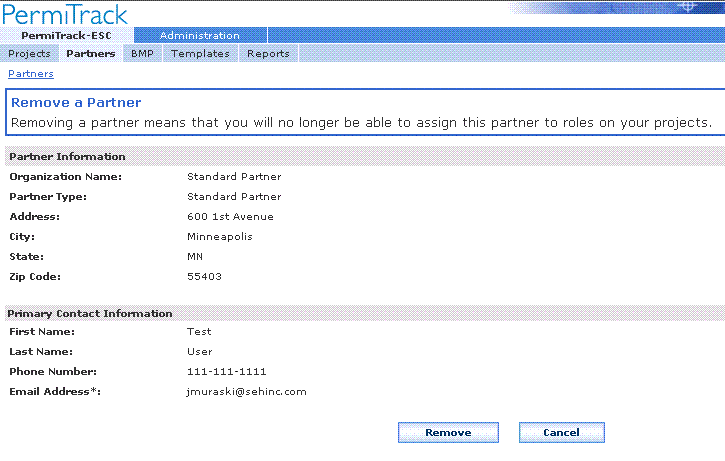
Figure 35. Delete Partner page
The system automatically enters the partner information. Review this information to be sure you want to delete this partner.
The Best Management Practices (BMPs) tab is used to define individual BMPs that can be assigned to projects, templates, or inspections. This tab is also used to create categories that are used to group the BMPs.
BMPs identify a type of erosion control measure that you want to specify for one or more projects. For example, set up a BMP to require a silt fence, temporary seeding, sediment basin, etc. The BMPs are selected during the project setup and are reflected on the inspection form for the project. A BMP can also be added to a specific inspection, as needed.
BMPs are set up by the Client Administrator and made available to all client projects either directly or through a template. They can be:
Categories are used to identify the BMPs used for a specific purpose, for a specific size or type of project, or under specific circumstances. For example, assign the BMPs used for perimeter control to the Perimeter Control category.
Categories are used to group the BMPs on the BMP list and to facilitate the process of assigning BMPs to a project, inspection, or template:
The BMP List page shows the active and inactive BMPs set up within your client account. All of the active BMPs are available for assigning to projects or adding to templates. From this page, you can add a BMP, edit an existing BMP, delete a BMP, or create categories for grouping the BMPs.
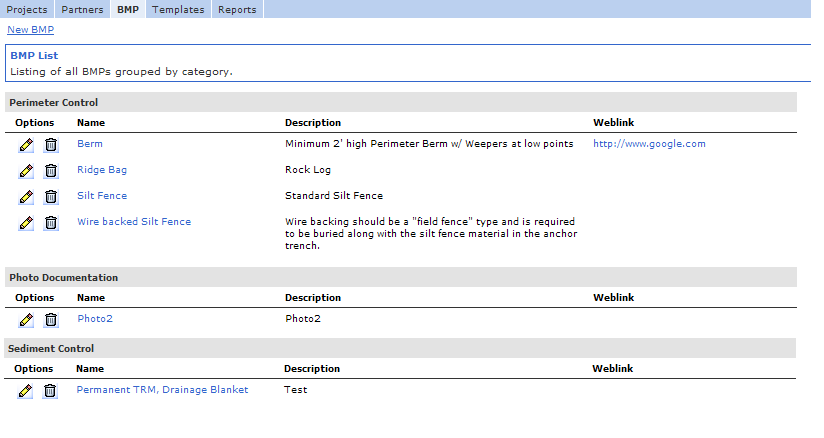
Figure 36. Best Management Practices List page
On the New BMP page, you name and describe the BMP you are setting up. After it is created, the BMP can be assigned to a project, included in a template, or added to an individual inspection.
The New BMP page opens when you click the Add New BMP link on the BMP List page.
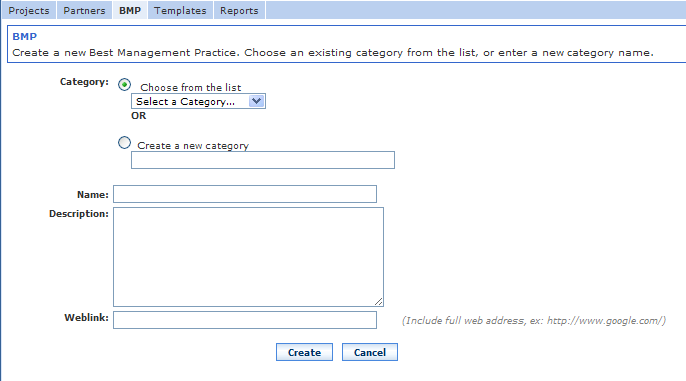
Figure 37. New BMP page
![]() Choose from the List
: Select this option button to choose a predefined category from the list. When you click the down-arrow next to the field, a list of categories displays.
Choose from the List
: Select this option button to choose a predefined category from the list. When you click the down-arrow next to the field, a list of categories displays.
![]() Create a New Category
: Select this option and type a name in the New Category field to create a new BMP category. This category is created when you click the Create button on this page. After you save, this category can be used for other BMPs.
Create a New Category
: Select this option and type a name in the New Category field to create a new BMP category. This category is created when you click the Create button on this page. After you save, this category can be used for other BMPs.
On the Edit BMP page, you can edit or change the name, description, category, or status of the BMP. You can also delete the BMP by changing the status to Deleted.
The Edit BMP page opens when you click the
![]() Edit icon next to a BMP on the BMP List page.
Edit icon next to a BMP on the BMP List page.
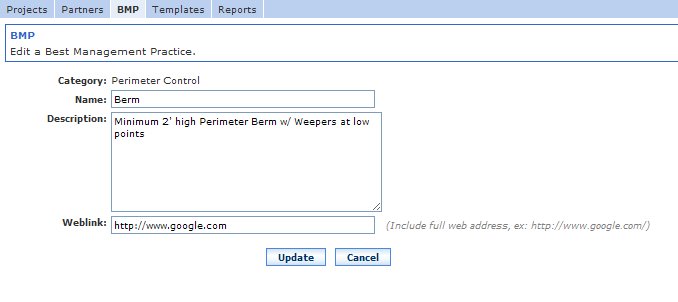
Figure 38. Edit BMP page
The fields on the Edit BMP page are the same as those completed when the BMP was created. See the New BMP page ().
The View BMP page shows you the name, description, and status for the BMP. This information is for reference only. You cannot edit the information on this page.
The View BMP page opens when you click the name of a BMP on the BMP List page ().
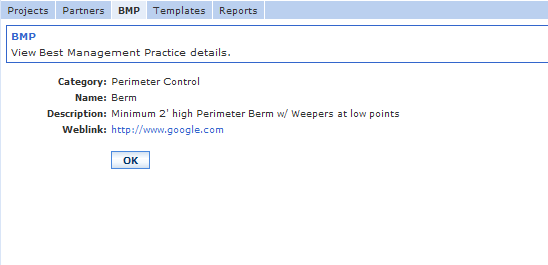
Figure 39. View BMP page
The fields on the View BMP page are the same as those completed when the BMP was created. See the New BMP page ().
Templates let you group BMPs that you use frequently for a specific type of project or specific purpose. The template is used to associate a group of BMPs with a project without needing to assign each BMP individually to the project. Templates can be used for multiple projects. For example, create a template with the BMPs that typically apply to a small residential project. Each time you create a new project for small residential construction, select the template to automatically add the appropriate BMPs to the project.
Using a template does not limit the BMPs that can be assigned to a project. After selecting a template for a new project, you can still specify additional BMPs for that project.
Note :A template is assigned to a project only when the project is created. To change the BMPs for an existing project, you must add or delete each BMP individually.
The Inspection Template List page shows the Templates setup within your client account. Each template, which can be assigned to any number of projects, includes one or more BMPs. From this page, you can add, edit, or delete templates.

Figure 40. Inspection Template List page
On the Create Inspection Template page, you name and describe the template you are setting up, and assign BMPs. After it is created, the template can be assigned to a new project to add the BMPs to that project.
The Create Inspection Template page opens when you click the New Template link on the Inspection Template List page ().
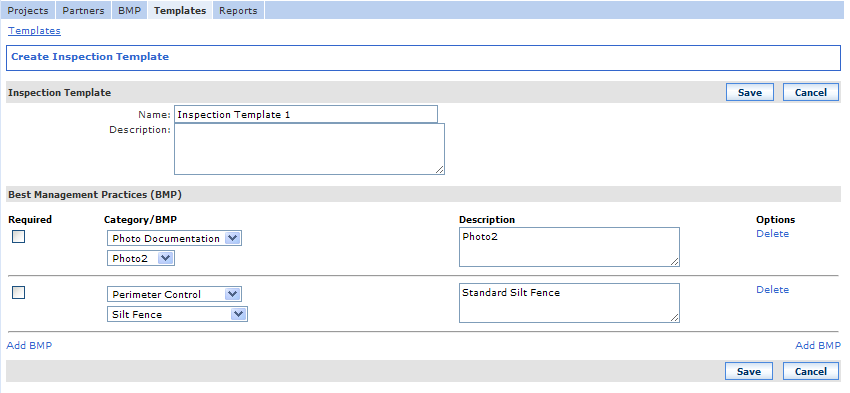
Figure 41. Create Inspection Template page
![]() Required
: Select this check box to require this BMP for the project inspection.
Required
: Select this check box to require this BMP for the project inspection.
![]() Required
: Clear this check box to recommend but not require this BMP for the inspection.
Required
: Clear this check box to recommend but not require this BMP for the inspection.
Note :An individual BMP may be marked as required after the template is assigned to a project, even though it is marked as not required as part of the template. This option gives you additional flexibility in assigning and requiring BMPs.
On the Edit Template page, you can change the template name, description, or BMPs included in the template.
The Edit Template page opens when you click the
![]() Edit icon next to a Template name on the Template List page ().
Edit icon next to a Template name on the Template List page ().

Figure 42. Edit Template page
The fields on the Edit BMP Template page are the same as those completed when the template was created. See the Create Inspection Template page () for more information on these fields.
The Reports page lets you view, save, or print summary reports:
On the Report Options page, select the type of report you want and run the report. You can view the report on-screen as an Adobe PDF or save it as an Excel file.
The Report Options page opens when you click the Reports tab.
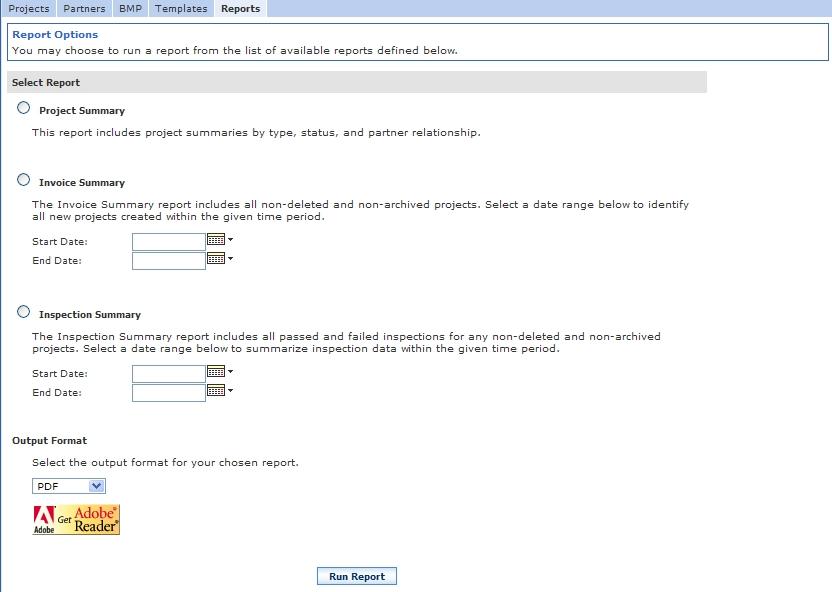
Figure 43. Report Options page
Select the Inspection Summary option, and then enter dates below, before clicking the Run Report Button.
In addition to the reports available through the Reports tab, these reports are available through other parts of the application:
|
Term |
Description |
|
Active Project |
An active project is actively being tracked. When a project is it can be included in the public access maps if GPS coordinates have also been assigned. |
|
Authorized Inspector |
An authorized inspector is a third party subcontracted to conduct the inspections. An authorized inspector is not required for a project. If a user account is set up for this organization, the authorized inspector can login to PermiTrackESC . |
|
BMP |
A BMP is a Best Management Practice used to reduce or control erosion. For example, installation of a silt fence may be a BMP required for a project and listed on the inspection form. |
|
BMP Category |
BMP Categories are used to group BMPs with a shared purpose so that you can locate them more easily. The BMP list is arranged by category. For example, the Perimeter Control category may include several control measures used for perimeter control. |
|
EOLAM |
EOLAM (Extended On-Line Access in Months) defines the length of time that the project data is available online, after the end of the project. The value is entered as a number of months to continue storing the data. EOLAM is taken into account when invoicing for system use by your client site. There may be a charge for additional storage, so we recommend downloading project information that you want to store for future reference. After downloading, the project can be deleted from the system. |
|
Inactive Project |
An inactive project is on hold. When a project is inactive it is not included in the public-access maps. |
|
Partner |
See Preferred Partner or Standard Partner. |
|
Permit Authority |
The permit authority is the agency that issued the construction permit for the project. This agency or organization may conduct inspections. If a user account is set up for this organization, the permit authority can login to PermiTrackESC . Only a primary client (the client that owns the site) can be assigned as the permit authority on a project. A primary client has a contractual relationship with SEH, Inc. to use the PermiTrackESC application. |
|
Permittee |
The Permittee is the organization, company, or unit of government that is receiving the permit. For example, the permittee may be the construction company or general contractor completing the project. The permittee may conduct the inspections. If a user account is set up for this organization, the permittee can login to PermiTrackESC . |
|
Preferred Partner |
A preferred partner has access to all of the features in the PermiTrackESC application. A preferred partner can create or edit projects, set up BMPs and templates, create events, setup users, etc. If a client is a preferred partner, they can create projects and assign their partner (i.e. the client that granted them preferred partner status) as the permit authority. For example, if ABC Construction is a preferred partner of the City of Springfield, ABC Construction can create projects and assign the City of Springfield as the permit authority. |
|
Project |
A project is a construction project or other work that needs to be inspected for erosion control. |
|
Project Type |
Project types are used to classify or categorize the type of project site. For example, the type may show that the site is a residential site of less than one acre or a commercial site with more than five acres. |
|
Standard Partner |
A standard partner has limited access to the application. This type of partner can create and edit inspections, and view project information. They cannot create projects. This type is typically used for a partner that will be a permittee or authorized inspector. |
|
SWMP |
Storm Water Management Plan |
|
Template |
A template is used to group BMPs that are commonly used together on a certain type of site or to address a certain type of problem. Templates are set up in advance so that they can be used to automatically assign BMPs to a project. |